Schedule a Facebook Post with Metricool
 Sara Martín
03 November 2023
Sara Martín
03 November 2023 
Scheduling your Facebook content in advance allows you to organize your work more efficiently, keep your social networks active, and encourage your followers to remain as part of your community. So in this post, I will be teaching you how to schedule a post on Facebook with Metricool.
Automating and scheduling your Facebook content is the way to go. Schedule your content daily, weekly, or monthly.
How to Schedule Facebook Posts
In order to schedule content wit Metricool, you need an active account. You can create one below, completely for free. 😊
↪️ Register Here ↩️
Do you already have an account?
Then let’s get started, it’s time to discover how to schedule Facebook posts with Metricool.
First Step: Go to your Metricool’s dashboard
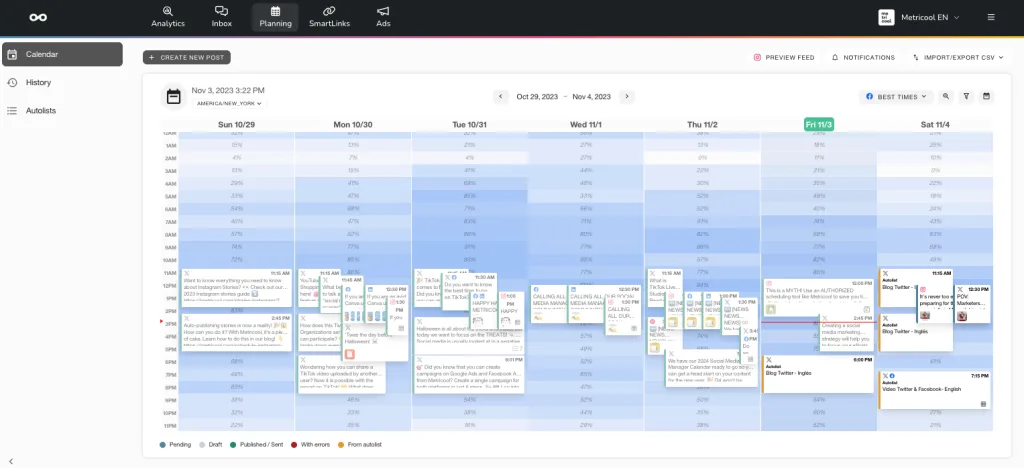
On the main menu at the top, click the Planner tab that will take you directly to the calendar, and the different options available to publish content.
Once there, you can view the best time to post for Facebook, discover when your followers are more active and therefore, aligning with your followers to reach a larger audience.
Second Step: Content options
There are several different options to plan your content on Facebook from Metricool. Before choosing the date and time to post, use the drop-down menu to choose the type of content you’re going to share. With Metricool you can schedule:
- Feed posts: Add images, videos, tag users, include hashtags, and emojis. Auto-publishing is available for this content, so the tool automatically posts for you.
- Stories: Upload images and videos up to 60 seconds. Auto-publishing available for this content.
- Reels: Upload Reels, maximum 60 seconds. Auto-publishing available for this content.
❗️Reminder that in order to schedule and auto-publish content, you must have a Facebook business account/page.
1. Schedule a post on Facebook from the calendar, at your best hours
Select the day and best time on the calendar, or, click Share New Post.
Write the text, add images, videos, links, mention other pages, add the location of your post and check how your publications will display on your Facebook page.
Any type of content you upload can be published automatically with Metricool.
This preview helps you decide if you need to make any changes or leave it as it is. You can also boost your Facebook publication directly from here.
Do you want to have the most accurate metrics for your links? Remember to add a UTM parameter inside the planner.
Another option you have inside the planner when scheduling Facebook posts with Metricool is to schedule the first comment on your post. This can be very useful to leave more information, add a CTA or any other content. On Facebook you can activate this option in a normal post and in a scheduled reel.
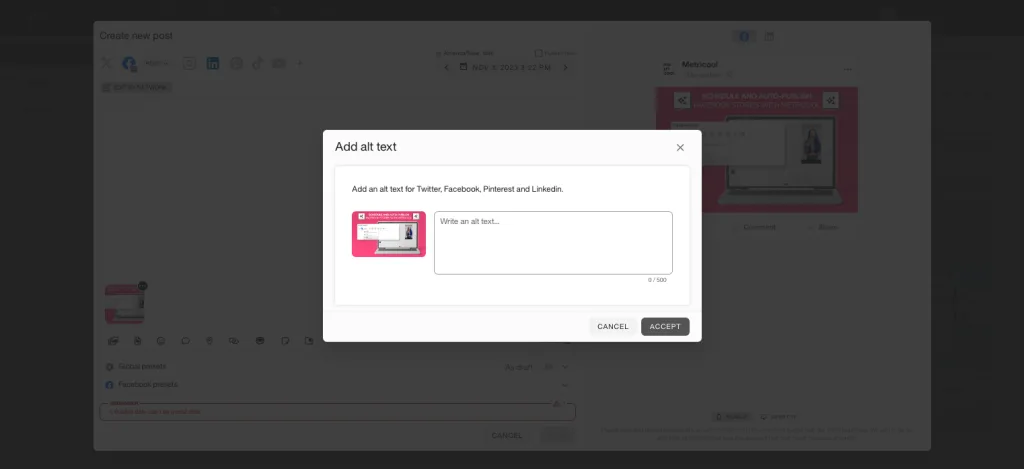
If you accompany your publication with an image you can add the ALT text and edit it to your liking from the Metricool planner: dimensions, filters, light, etc. from the Metricool planner. With this descriptive text you will allow visually impaired people to know the content of your image.
Tip
Getting the most out of your publications is in your hands. With Metricool, you can discover the “hot” hours for your Facebook followers on the calendar, marked with the darkest color and the highest percentage of active followers (remember to activate this option in the advanced settings button within the planning section). With this information, you can plan your strategy and direct your posts to those hours when your followers are more active and you have a higher chance of reaching your audience. Sign up with Metricool and check the best times to schedule on Facebook.
2. Upload a CSV file with your planned publications
Prepare a CSV file (Excel) with the 18 columns that appear in the template provided. You can configure the character to be used as a separator between columns.
If you want to check the template, you can download it here.
You can import photos with this CSV file, as far as they have a URL.
3. Create autolists to program Facebook
Amongst Metricool’s features is the option to create autolists to share and program content on Facebook and other social networks. Go to Autolist under the planner section, on the sidebar menu.
An autolist is a group of publications that you will share on different social networks. This content can be programmed periodically so you can relax with the peace of mind that your social networks are well taken care of.
To configure an autolist, fill in the fields displayed on the main page:
✅ Name and configuration:
Create a name that defines the content within the list to schedule on Facebook (e.g best posts, frequent tweets, new blog post, podcast episode, etc.).
✅ Repeat
This option is to make the autolist a circular list. Once a post is published, it will go to the end of the list waiting for being published again.
If you don’t enable this option, when the content is published, it will be removed from the autolist so it can’t be published again.
✅ Shortener
If this option is on, it will shorten your URLs automatically without the need to use a third party shortener. If you use it, you will get information about the clicks received on your links.
✅ Social media channels
Activate the social networks where you want to share your publications simultaneously. Otherwise, you can create an autolist for each social network separately. Select Twitter, LinkedIn or Facebook, together or separate.
✅ Scheduling
Schedule what your next Facebook publication will be, and choose the time and days that you consider best. We recommend that you previously check the best times to publish in the calendar for each social networks. Add as many rows you want or select several days at the same time.
✅ The position of a post within the list
You can check the position number on the top-left corner of each publication, this way you can easily know which post will be published next. You can change the position by clicking the number or by clicking, holding and dragging the publication.
✅ Pause:
You can press on/off to pause or activate a publication of your autolist. It’s very useful when the content of a post is seasonal and shouldn´t be published for a specific season.
✅ Trash:
This button deletes the content that is part of an autolist when we are not interested in publishing it anymore.
✅ Content list:
It’s time to generate posts that you want to include in an autolist. There are three different ways to do so: Manually, by adding each publication one by one, uploading in bulk with a CSV file or with a RSS feed.
1- Manually:
Tap Write new and create the publication to be included in the autolist. You can write one by one and as many as you want.
2 In bulk with a CSV file:
Upload a CSV file with all the information of the posts you want to add to the autolist. When you click Add all, all the posts will be added. The CSV file must have two columns: The first one with the text and the second one with the images’ URL (optional). You can configure the character used as a separator between columns.
3 With a RSS feed:
An RSS feed is a file generated for some websites with the information published by that site. For example, Metricool’s RSS feed contains the post of our website blog.
This RSS feed is updated each time that something new is published on our blog. In order to add this feed to the autolist. First, add the feed’s URL and click search. If it is correct, it will show the recent content that the feed contains. The next step is to fill out the following information:
→ Prefix: text that will go at the beginning of all the publications that your feed contains
→ Suffix: Text placed at the end of each publication.
At the end of the configuration process, there are three options that you can choose from:
1. Include previous publications: if you click this option, the last content in the RSS will be included in the autolist along with future content. If you don’t check this option, only new publications will be included, that is, the autolist will start when there is a new publication.
2. Add deactivated publications: This means that all publications will be included as deactivated to the autolist. In other words, they won’t be published on social media unless they are manually activated.
3. Add to the beginning of the autolist: if you check this option, the new RSS publications will be added to the beginning of the autolist. If you do not tick this option, they will be added at the end of it by default.
4. Schedule your content with Canva
Do you have a Canva account? With the integration of this tool and Metricool you can schedule your publication without leaving the page.
That is, you design your multimedia content in Canva and the design tool itself takes you to Metricool with your image or video already uploaded and the copy you have added.
All you have to do is customize your post and choose the date and time to publish it on Facebook, and you’re done!
You can add links, images (up to 4 per publication) or videos and animated GIFs. So easy!
View the Calendar or Download a CSV
On Metricool’s calendar you can check all your publications scheduled on Facebook and the other social networks. It’s a great way to have an overview of the content that will be published on your social platforms.
On the planner you can also check the autolists scheduled.
Besides, you can download the information from the calendar in a CSV file.
Discover your Best Performing Posts and Replicate
With Metricool you can analyze the impact and performance of your publications in order to optimize your time and make sure to create posts that work well.
Click on the Evolution section and then Facebook on the sidebar menu. If you scroll down, you can see a performance analysis of each of your Facebook posts.

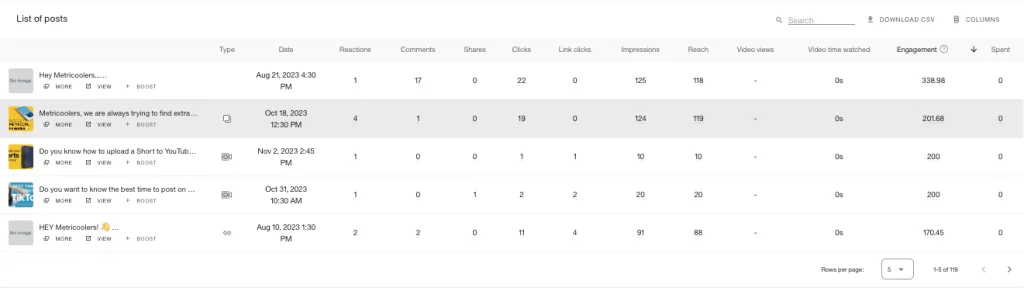
If you see posts that have done really well, Metricool gives you the option to promote those posts.
Also, you can duplicate each post and repost it in the future. All the history of your publications planned from Metricool is saved.
Well, we’ve covered everything about how to plan your posts on Facebook and analyze the impact of your publications with Metricool.
If you are interested in knowing more about Metricool’s features? Check this updated guide:
