

Metricool Tutorial: How to Use Metricool from Setup to Reports
 Gretchen Oestreicher
02 July 2026
Gretchen Oestreicher
02 July 2026 
Metricool brings scheduling, analytics, reporting, and message management into one place, so the work doesn’t get scattered across half a dozen tabs. Setting up Brands, scheduling across every network, reading the numbers, replying to messages, building reports, and connecting it to AI and automation all happen in the same app.
The pieces are built to work together. A post scheduled in the planner turns into analytics once it’s live, those numbers roll into reports, and the comments it picks up arrive in the Inbox. Learning how to use Metricool is mostly a matter of seeing how that loop fits together: plan, publish, measure, respond, then start over.
This Metricool tutorial answers the question new users ask most: how does Metricool work? It walks through every part of the tool, from your first login through scheduling, analytics, reports, and beyond.
Getting Started with Metricool in Five Minutes
You just created your account. Here’s the fastest path from an empty dashboard to managing your networks.
Step 1: Understand How Metricool Is Organized
Before you connect anything, it helps to know how Metricool structures your account. There are three levels:
- User: This is the account you created when you registered, tied to an email address. To open your account info, click the menu in the top right and go to Account Settings.
- Brand: A Brand is your container for a single business, client, or project. Each Brand groups all the social accounts and ad platforms for that one identity in one place. Think of it as a folder that holds everything digital for that business.
- Social Profile: A social profile is an individual account you’ve connected, like a Facebook Page or a TikTok account. Each Brand holds one profile per platform.
The rule to remember: one Brand holds one profile per platform. One Instagram account, one Facebook Page, one TikTok account, and so on.
If you manage several businesses or locations, you’ll create a separate Brand for each. On the Free plan you get one Brand, and paid plans let you create more.
Step 2: Connect Your First Social Profile
Now connect at least one account so Metricool can start pulling in your data.
- Click your profile picture in the top right, then choose Connections.
- Select your Brand from the dropdown.
- Choose a platform and follow the authorization flow.
- Repeat for any other profiles you want in that Brand.
You’ll need admin or owner permissions on the accounts you connect, and you should accept all requested permissions so the tool works properly.
Supported platforms include Facebook Pages, Instagram (Business or Creator), Threads, X (Twitter), Bluesky, LinkedIn, Pinterest, TikTok, Google Business Profile, YouTube, and Twitch, plus Meta Ads, Google Ads, and TikTok Ads. You can also add a website or blog.
Step 3: Find Your Way Around
Metricool’s top menu is split into six main sections:
- Analytics: the performance metrics for every connected account. The Hashtag Tracker lives here too.
- Reporting: turn your data into reports and dashboards to analyze, share, or present. This is home to Reports, Campaign Dashboards, Metricool Studio, and the Looker Studio connector.
- Inbox: messages and comments from all your connected profiles, in one place.
- Planning: your content calendar and scheduler.
- SmartLinks: link-in-bio pages for your profiles.
- Ads: create and manage ad campaigns.
To switch between Brands, use the dropdown next to the Brand name.
Step 4: Your First Quick Wins
Once a profile is connected, Metricool starts syncing, so open Analytics to see your first metrics. The data can take a few minutes to appear.
When you connect a new profile, Metricool retrieves the previous 30 days of data, with some exceptions for follower counts and Stories. From that point on, everything is tracked going forward.
To schedule your first post, go to Planning, click the plus button or any date on the calendar, choose the profile, upload your content, set the time, and click Schedule. Free plans include 20 published posts per month (scheduled drafts don’t count), and the counter resets on the 1st.
Step 5: What Comes Next
Once the basics feel comfortable, the rest of this guide walks through everything else: tracking competitors, building reports, setting up SmartLinks, managing your Inbox, running ads, and connecting Metricool to AI tools. Read on.
Setting Up Your Brands and Connections
What a Brand Is and How It Works
A Brand lets you manage, plan, and analyze all the social accounts and ad platforms of a single business in one place. Inside each Brand you can connect:
- A website or blog
- A Facebook Page
- A professional Instagram account (Business or Creator)
- A Threads account
- An X (Twitter) account (available as an add-on on Premium plans)
- A Bluesky account
- A LinkedIn Page or profile (not on the Free plan)
- A Pinterest account
- A TikTok account
- A Google Business Profile location
- A YouTube channel
- A Twitch channel
- A Meta Ads account
- A Google Ads account
- A TikTok Ads account
If you need to combine data from several Brands into one view, the Looker Studio connector and Metricool Studio both handle that. More on those in the Reporting section.
One Brand, One Profile per Platform
Each Brand holds a single profile per platform. A few examples of how that plays out:
- If you manage several Google Business Profile locations, create a separate Brand for each one.
- If you run different Facebook Pages for each country or language, give each Page its own Brand.
At Metricool, the team runs this way internally, with separate Brands for Spanish, English, French, and other languages. Each team works with its own data, posts, and metrics, with no overlap.
Tip: rename your Brands from the Brand Settings panel so they’re easy to find in your dashboard.
Don’t Reuse a Brand with a Different Profile
It can look convenient to disconnect one profile and connect a different one under the same Brand, but it causes problems. Here’s why.
When you disconnect a profile, the analytics collected so far stay in the tool. If you then connect a new profile, it starts syncing its own data, and your reports can end up mixing two different accounts.
The planner content sticks around too. Existing drafts and scheduled posts aren’t deleted, because each Brand has a unique identifier (its blog ID) that stays the same even when you swap profiles. All planner content is tied to that ID.
This setup exists so you can reconnect a network later without losing your content if it ever drops. For that reason, create a new Brand any time you need to work with a different profile.
The Connection Dashboard
There are two ways to reach the Connection Dashboard:
- Top right dropdown menu, then Connections.
- Choose the Brand from the top right dropdown, then Analytics, then Brand Settings.
From the dashboard you can:
- Connect social networks, ad platforms, and a website.
- Add new Brands.
- Set up Brand names and pictures (use “View as table” to see all your Brands at once).
- Manage user access (Advanced and Enterprise plans).
- Delete Brands.
Free accounts have one Brand and can’t create or delete Brands.
To connect an account, click the platform you want, log in with your credentials, grant any specific permissions, and authorize Metricool’s access. If you connected the wrong account, you can change it from the same dashboard.
For advanced needs, you can integrate Metricool with tools like Looker Studio, Zapier, and Make through the API. Those are covered later in this guide.
Adding Competitors
Tracking other accounts in your industry helps you spot trends and compare your metrics, like engagement, against the market. From the Competitors section you can monitor public profiles without needing private access and watch how they perform next to you. A useful trick: add your own account as a competitor so you can see your public-facing numbers alongside everyone else’s.
Competitors shows public data only. Connecting your own profile with permissions gives you far more detailed metrics.
Availability by network: Facebook, Instagram, Threads, Bluesky, and Twitch are available on Free and Premium. X (Twitter) and YouTube are Premium only, and X requires the paid add-on. To track Instagram competitors, your Instagram account must be linked to Metricool through Facebook.
The plans differ in how much they let you track. The Free plan gives you a demo: up to 5 accounts per network, no editing or deleting once added, and two fixed YouTube competitors with no option to add more. Premium plans let you add up to 100 competitors per network (up to 10 on YouTube) and manage them freely.
To add a competitor, go to Analytics, open Competitors, click Add, enter or search for the account, and click Add to finish.
How you search depends on the network:
- Facebook, X, Bluesky, and YouTube: search and select from suggestions (YouTube also accepts a channel URL that includes /channel/ or /user/).
- Instagram, Threads, and Twitch: enter the exact account name.
Instagram requires a professional account here, and Threads accounts must be public, over 18, and have more than 100 followers. Some X accounts won’t appear if they’re private or not indexed.
Planning and Publishing
Planning is where most of the daily work happens. This section covers the calendar, scheduling a post, what each network supports, and every scheduling method Metricool offers.
Getting Around the Calendar
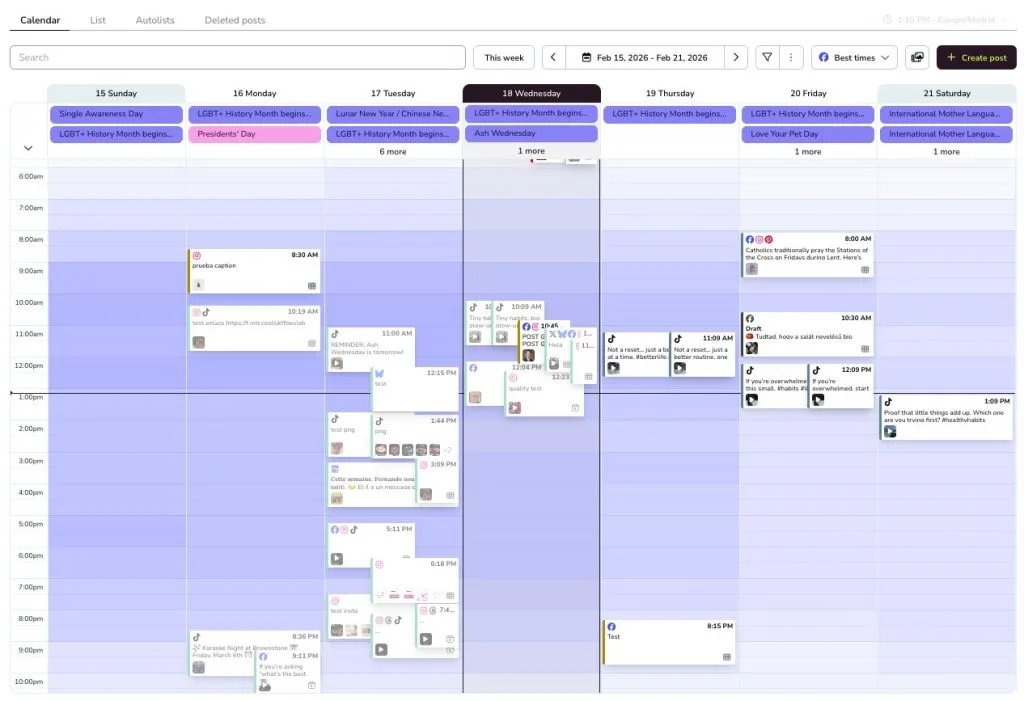
The tools in Planning let you move through dates, set your time zone, filter posts, and change how the calendar looks.
- Move through Dates: Use the arrows at the top of the planner to jump between periods, click “This week” to return to the current week, or click the date range to open the calendar selector.
- Set the Time Zone: The planner shows the active time zone next to the current time. By default it uses the time zone from your account settings, and you can change it from the dropdown next to the current time. If your city isn’t listed, pick the nearest major city in the same zone. Review this before scheduling if you manage content across regions.
- Choose the First Day of the Week: This one lives in your account settings, not the planner toolbar. Open the menu in the top right, go to Account Settings, and under the Account tab open Preferences, then First day of the week. Pick Sunday or Monday and save. It changes the weekly layout across all your Brands.
- Change the Calendar View: From the three-dots menu in Planning, choose Calendar view, then Day, Week, or Month.
- Use Calendar Zoom: Also in the three-dots menu, Calendar zoom changes visual density: Condensed fits more in less space, Normal is the default, and Expanded gives each block more room.
Other planner tools in the three-dots menu include Social Calendars, Import CSV, Export CSV, Preview feed (to check your Instagram grid before publishing), and Notifications. Depending on your plan, the toolbar may also show shortcuts for services like Canva or Google Drive.
Filtering Your Calendar
When you want to focus on one part of your plan, click the filter button in Planning, select your filters, and click Apply. The panel opens vertically, so scroll to see everything.
You can filter by social network (and by post type on networks that support it, like Facebook Post/Reel/Story or Instagram Post/Reel/Story/Trial Reel), by publication status, by approval status (Advanced and Custom plans), by notes, and by Campaign Dashboard. There’s also a search bar to find a specific post fast. When filters are active, the filter button shows how many are running.
Publication Statuses
When you look at the calendar, posts appear in different states:
- Published / Sent: Published means the post went live and is visible. Sent applies only to Instagram and TikTok when autopublish is off: Metricool sends a notification so you can finish the post manually in the native app.
- Pending: Scheduled and waiting for its publication time.
- Draft: Saved but not scheduled yet.
- With Errors: The post failed to publish. Open the post details for the error message.
- From Autolist: The post was created automatically from an autolist.
You may occasionally see “Published with warnings,” which means the post went live but some elements didn’t apply, like certain Instagram collaborators or TikTok settings. This is uncommon and usually comes down to API limits or permissions.
A note on Sent posts: when the notification arrives, the media files download and the text copies to your clipboard, then you finish the post in the Instagram or TikTok app.
If you’d rather a post publish automatically, duplicate it and turn on the Autopublish toggle, as long as the content meets autopublishing requirements. Some content can’t be autopublished because of API limits, such as Instagram Stories from creator accounts or posts with trending music, links, or interactive stickers. In those cases, manual publishing via notification is the only option.
Scheduling a Post
You can schedule a post across many different social media accounts.
To schedule a single post:
- Go to Planning and click “Create new post,” or click a time slot in the calendar. Select the platforms you want to publish to (their icons turn color). From the calendar you can also see your best times to post based on your audience on Facebook, Instagram, Twitter, and TikTok. Darker shading means a better time, and you need at least 100 followers to see this.
- Write your text in the text box. You can add links and mentions with the @ symbol.
- Add your media: your own images, images from the built-in Pexels library, videos, or GIFs, depending on each network’s requirements. Click the three dots on an attachment to see the options, and edit images or videos right in the planner.
- Set any global presets (covered below) and any network-specific options.
- Pick the time and day, then finish.
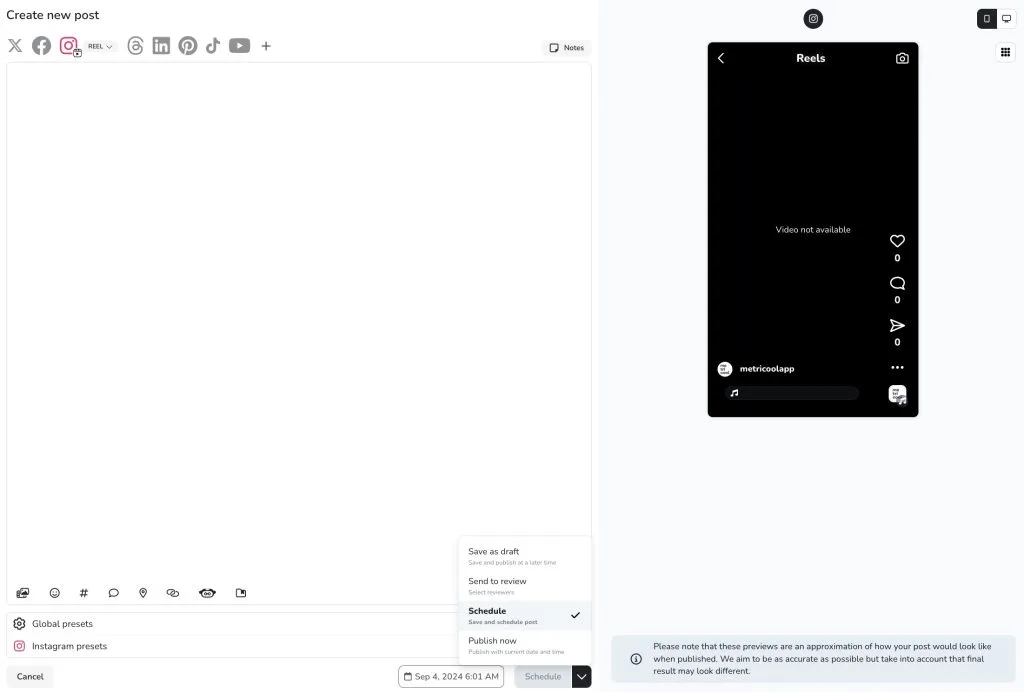
When you finish, you have several ways to save:
- Schedule: save and publish at the chosen time.
- Save draft.
- Save to the library.
- Send to review (for content approval on Advanced and Custom plans).
- Publish now.
Before you finalize, preview how the post will look on desktop and mobile. For Instagram, you can also check the feed preview to see how the post fits the rest of your grid.
Once a post is saved, you can duplicate it within the current Brand or duplicate it to other Brands. To delete a post, click the trash icon.
Global Presets and Network Presets
Under additional options you’ll find global presets that carry over to the posts you create afterward until you change them:
- URL Shortener: Hide the original URL. Links are shortened when the post publishes, not before, and all links in a post are shortened. Metricool’s shortener doesn’t track clicks, which gives you more privacy and control.
- SmartLinks: When the post publishes, it’s added automatically to a SmartLink you selected beforehand.
Below the global settings, you can configure network-specific options for the platforms you selected (Instagram, TikTok, Threads, Twitter, LinkedIn, Pinterest, YouTube, and so on).
What You Can Publish on Each Network
Here’s a quick summary of the formats you can schedule and the character limits per network.
| Network | Images | Videos | GIFs | Carousel / Thread | Character limit |
|---|---|---|---|---|---|
| Up to 10 | 1 video, Reels (3 to 90 sec) | 1 | No | 16,192 | |
| Up to 10 | Up to 10 (Reels max 15 min) | No | Carousel (image + video up to 60 sec) | 2,200 | |
| Threads | Up to 20 | Included | Yes | Threads up to 80 posts | 500 |
| X (Twitter) | Up to 4 | 1 video | 1 | Threads up to 80 posts | 280 / 25,000 (X Premium) |
| Bluesky | Up to 4 | 1 video | 1 | Threads up to 80 posts | 300 |
| Up to 20 | 1 video | 1 | Carousel (image or file); PDF, PPT, DOC | 3,000 | |
| 1 image | 1 video | No | No | 500 | |
| TikTok | Up to 35 images | 1 video (3 to 10 min) | No | Image carousel | 2,000 auto / 2,200 manual |
| YouTube | No | Shorts (3 min or less), long videos | No | No | 5,000 |
| Google Business | 1 image | 1 video (Photo format) | No | No | 1,500 |
Facebook also supports Stories (60 sec), Instagram supports Stories, and Threads supports Ghost posts. Always check each network’s daily posting limits as you plan.
Network-Specific Features
Some features only exist on certain networks. The table below shows where each one is available.
| Feature | FB | IG | Threads | X | Bluesky | TikTok | YouTube | GBP | ||
|---|---|---|---|---|---|---|---|---|---|---|
| Location | Yes | Yes | No | No | No | No | No | No | No | No |
| Mentions | Yes (pages) | Yes | Yes | Yes | Yes | Yes | No | No | No | No |
| Alt text | Yes | Yes | Yes | Yes | Yes | Yes | Yes | No | No | No |
| Tag people | No | Yes | No | Yes | No | No | No | No | No | No |
| Add title | Yes | Yes | No | No | No | No | Yes | No | Yes | No |
| First comment | Yes | Yes (feed) | No | No | No | Yes | No | Yes | Yes | No |
| Add cover / thumbnail | Yes | Yes | No | No | No | Yes (video) | Yes (video) | Yes | Yes | No |
| Hashtag search | No | Yes (premium) | No | No | No | No | No | Yes (premium) | No | No |
| Promote post | Yes | Yes | No | No | No | No | No | No | No | No |
| Who can reply | No | No | Yes | Yes | No | No | No | No | No | No |
A few networks have their own exclusive options:
- Instagram: mix formats in a carousel, add up to 5 collaborators, tag products, add audio to Reels from Metricool’s library, edit the displayed audio name, and choose whether Reels appear in the feed.
- Bluesky: add the languages used in the post text so Bluesky can classify it.
- LinkedIn: show a link preview (works with one link and at most one image), or publish images as a PDF carousel instead of a gallery.
- YouTube: mark whether the video is made for kids, set privacy (Public, Unlisted, Private), choose a category, and add tags.
- Pinterest: pick an existing board or create one, add a link, and use the new pin format Pinterest recommends.
- TikTok: allow comments, duet, and stitch; add music (Business accounts can use the 100 trending songs, personal accounts get random music on photos); flag commercial content as your own brand or branded content; set privacy on personal accounts; and mark AI-generated content on personal accounts.
Scheduling Limits
When you schedule manually from the calendar, there’s no cap on how far ahead you can plan. You can schedule months or years out.
Limits only apply to two features: recurring scheduling tops out at 180 days, and AI-generated scheduling tops out at 90 days.
Autolists: Recycling and Recurring Content
Autolists let you build lists of posts that repeat automatically on a schedule you set, so you stay active and recycle content with little upkeep. The basic idea: create your list, set the frequency, and let the autolist publish for you.
A few things to keep in mind:
- Each autolist holds up to 200 posts, and anything beyond that won’t publish.
- You can’t tag people or products on Instagram posts inside an autolist.
- The maximum is 10 attachments per post.
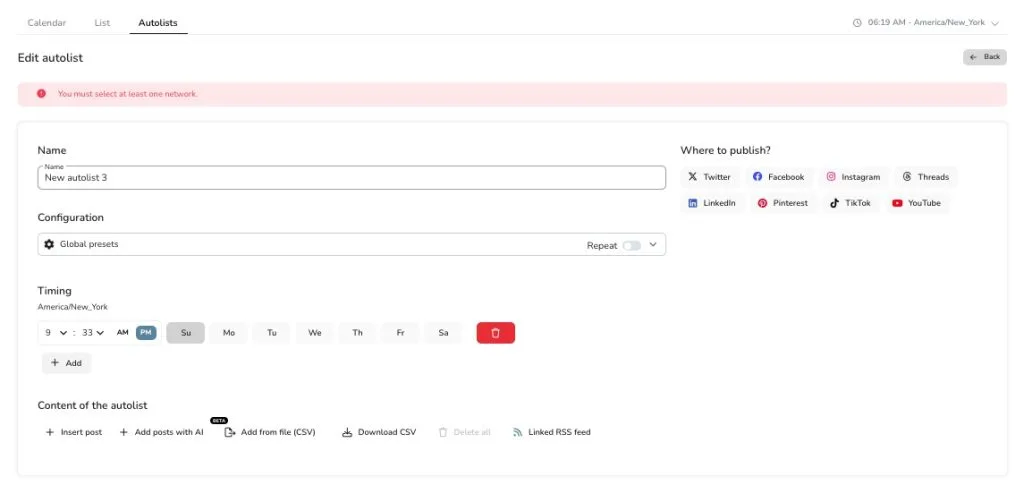
The overview screen shows the next post date, active networks, pending posts, and whether repetition is on. From there you can turn each autolist on or off, or delete it. Posts publish in the order you set and are removed once published, unless you turn on “Repeat,” which makes the list circular: a published post moves to the end to run again later.
When you build an autolist, you’ll work with these fields:
- Name and Configuration: name the list after what it holds, like “Best posts” or “Periodic tweets.”
- Repeat: turns the list circular, as described above.
- URL Shortener: shortens your links automatically and gives you click stats.
- Networks to Publish: turn on the networks you want to post to at once, or build separate autolists per network.
- Scheduling: choose the times and days. Each row adds a time, and the list reads vertically each day. Check your best times to post first.
- Post Position: the number by the camera icon shows where a post sits in the order. Drag a post or click the number to move it.
- Pause Button: pause any post that shouldn’t go out yet, useful for seasonal content.
- Save Texts: store copy or hashtags you reuse and drop them in with one click.
To set one up, click New Autolist, select your networks, set the global and per-network settings (including Repeat if you want it circular), choose the days and times, and add your content. Autolists run on a weekly frequency, so add as many rows as you need.
You can add content several ways: insert posts manually, add posts with AI, add from a CSV file in bulk, or link an RSS feed. To duplicate an autolist, download its CSV (a Premium feature), create a new autolist, and add the content again with “Add from file (CSV).”
Linking an RSS Feed to an Autolist
An RSS feed can fill an autolist automatically as you publish new content on your site. Metricool works with RSS feeds from blogs that follow the standard XML format. Other feed types, like YouTube or Instagram, have a different structure and may not work correctly.
To link a feed:
- Add the feed URL and click Search. If it’s valid, recent items appear.
- Set a prefix (text at the start of every post) and a suffix (text at the end).
- Choose your options: include previous posts (pull in recent content alongside upcoming items), add disabled posts (added but not published until you turn them on manually), and add to the beginning of the autolist (otherwise new items go to the end).
- Click Save.
Metricool pulls each item’s main image from the Open Graph image tag on your page, so make sure that tag is set if you want the right image to show.
Image behavior also varies by network. Instagram and Pinterest show the image directly in the autolist and the post, while networks like LinkedIn, Facebook, Twitter, and Google Business Profile show only the link and generate their own preview at publish time. So if an image doesn’t appear in the autolist for those networks, that’s expected.
Recurring Posts
The Schedule recurrence feature creates multiple posts with the same content across one or more Brands, setting the dates and times for you. It’s available on Advanced and Custom plans, with two modes: guided and expert.
To access it, create your post as usual, click the dropdown arrow next to the Schedule button, and select Schedule recurrence.
Guided mode uses structured fields:
- Pick the scheduling type: Recurring (choose days of the week and a duration like 3 weeks) or Custom (select specific dates from the calendar).
- Set the publish time manually, or enable “Use best times” to let Metricool assign the best slot per network.
- Choose whether each Brand uses its own time zone or a shared one.
- Confirm the included Brands and networks, then click Generate preview to see every post that will be created, with dates, times, Brands, and networks.
- From the preview, edit times, select posts individually, or regenerate.
- Finish by saving as draft or scheduling.
Expert mode lets you type instructions directly in a prompt, like “Schedule this post in all my brands for 3 weeks on Tuesdays and Thursdays at 18:00.” Include a specific time and a specific day or period.
Metricool generates the posts in the background, so you can leave the window and get a notification when it’s done, then review and edit before confirming. The same caps apply: up to 180 days and 200 posts, scheduling only.
Bulk Scheduling with a CSV File
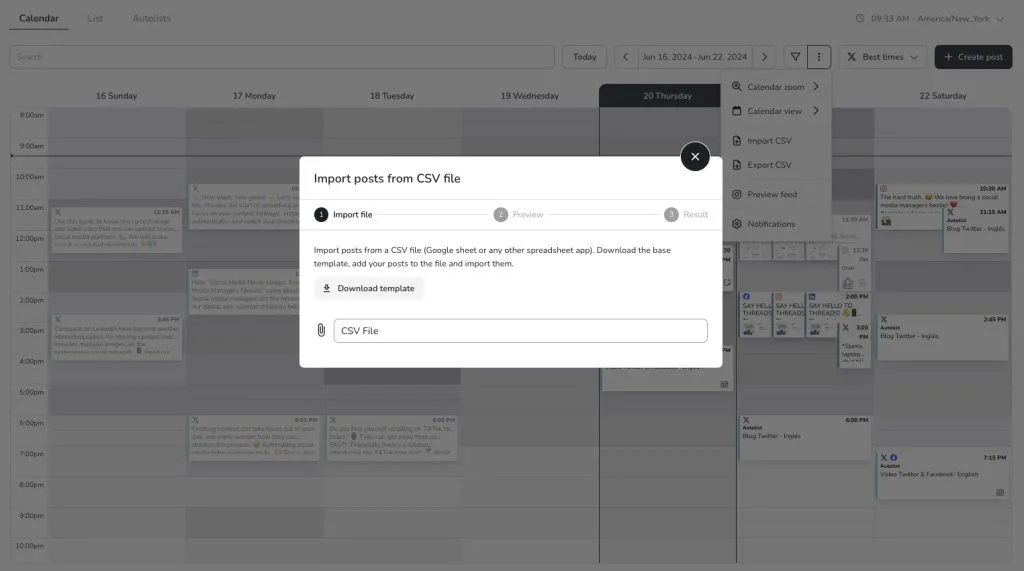
You can batch-schedule content by importing a CSV, either from the calendar (for one or several Brands at once) or from the Autolists section. Use Metricool’s template to fill in your posts, then import it.
For media, public URLs work best, and any Google Drive files you link need to be shared publicly with edit access. The template supports the languages each platform supports, except Japanese.
The Posts Library
The Posts Library is a space inside the planning media resources where you save draft posts and ideas as templates, without setting a publish date. When the time is right, you set the date and publish. It’s a Premium feature, holds up to 50 saved ideas per Brand, and is shared across users with permissions on a shared Brand.
You can save posts to the library a few ways:
- After creating a new post, choose “Send to Library” instead of scheduling.
- Duplicate an older post and send the copy.
- Reuse a high-performing post from Analytics with “Reuse Content” and send it.
- Duplicate an unscheduled draft.
Only unpublished or unscheduled posts can go straight to the library, so for published or scheduled posts, duplicate first and save the duplicate.
To publish from the library, find the post with search or filters, click it or drag it to the calendar, edit if needed, set the date and time, and finish.
The 50-post limit per Brand can’t be raised. To add new ideas once you hit it, delete older ones.
Social Calendars
Social Calendars help you plan around the dates that matter through the year, from big campaigns like Black Friday to lighter ones like National Dog Day. They live in your planning dashboard and give you two ways to add events: explore preset calendars curated by Metricool, or import your Google Calendar using an iCal (.ics) URL.
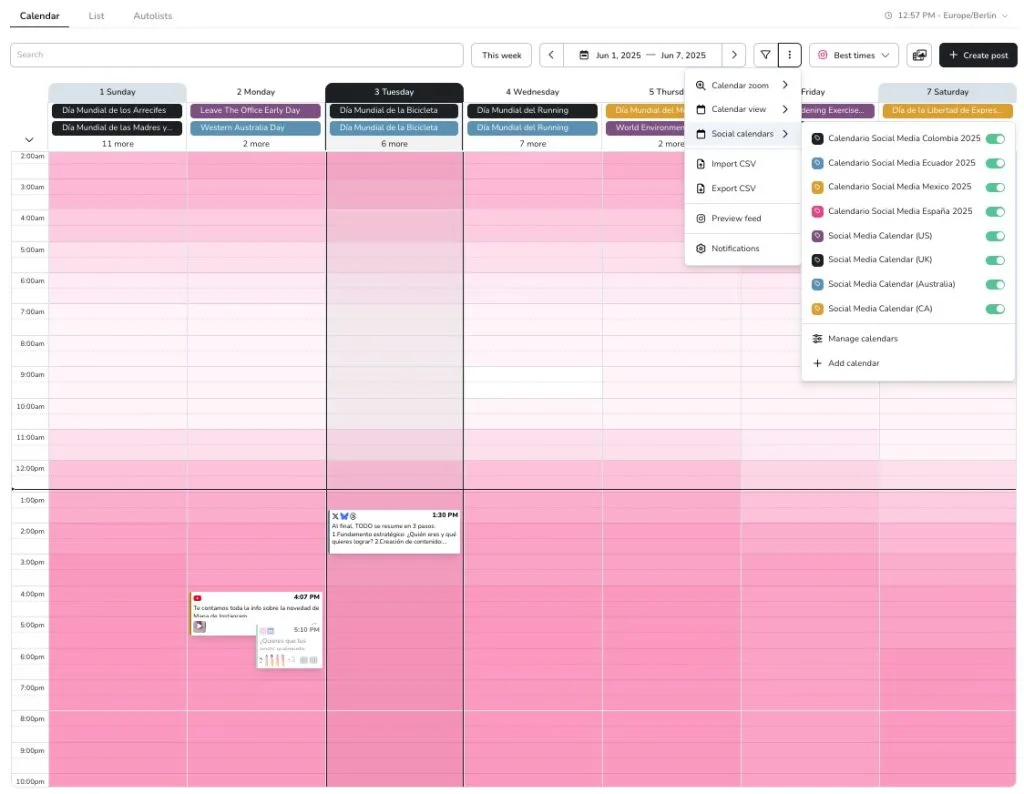
When you add a calendar, you decide who sees it: by Brand (all collaborators see it), by user (only you, across all your Brands), or both.
Syncing depends on the type. Preset calendars update automatically. Imported calendars sync every 30 minutes, and you can trigger a manual sync from the three-dots icon next to the calendar.
To add a preset calendar: in Planning, click the three-dots icon and choose Social Calendars, hit “Add calendar,” pick the ones you want in the “Explore calendars” tab, choose by Brand or by user, and click Add. Preset calendars match your account’s language and show the Metricool icon so they’re easy to spot.
To import a Google Calendar, open the settings of the calendar in Google Calendar, find “Integrate calendar,” and copy the iCal (.ics) URL. The calendar must be public or it won’t work. In Metricool, go to Add calendar, then Import calendar, paste the URL, and click Add. Metricool pulls the name, description, and color automatically when available. If you use a different calendar tool, export it as .ics and import it into Google Calendar first.
A few things worth knowing:
- Calendars can’t be edited once added, so to change one, delete it and add it again.
- You can change a calendar’s color from the management section, but that color is only visible to you.
- Corporate Google calendars can be imported by URL, but Google blocks Metricool from reading their events, so they’ll appear empty.
Building UTM Links While You Plan
UTMs (Urchin Tracking Modules) are parameters added to the end of a URL to track where each visit comes from. They’re read in Google Analytics or similar tools, not in Metricool, but you can generate a UTM link from the planner.
To create one:
- Go to Planning and click “Create new post.”
- In the bottom options bar, click the link icon.
- Fill in the required fields: the website URL, the source (where traffic comes from, like Facebook or an email), the medium (email, banner, and so on), and a campaign name. Optionally add a search term and content field to tell similar campaigns apart.
- Click Save.
UTMs can’t be applied to the Instagram Story format. If you’d rather not show the full link, turn on the shortener in global settings so it shortens at publish time. To edit a UTM link before publishing, change it directly in the text field, or click the link and then the UTM icon.
Writing Posts with the AI Text Generator
Metricool’s AI text generator drafts post text from the information you give it, and you can review and adjust it before scheduling. It’s available in the calendar and in autolists.
Each plan includes monthly AI credits: Free gets 5 per month, Starter 20 per Brand per month, Advanced 35 per Brand per month, and Custom 20 per Brand per month (customizable).
To create text from the calendar, click “Create a new post” and select the robot icon in the lower bar of the text box. From autolists, open or create an autolist and click “Add post with AI.”
Then enter a few words about your topic (for example, “Community Manager Day”), pick a tone (Formal, Informal, Creative, and so on), choose a language, and optionally select a network to tailor the text. Click “Generate post.” You can then refine the result, add hashtags or a call to action, lengthen or shorten it, and click “Use text,” then Accept.
The generator can build threads too. Select X (Twitter) or Threads (or both), generate your text, and the “Convert to thread” option appears. It produces five posts. Click “Use thread” and save.
You can also shape the AI’s writing style. Under Brand settings, AI Configuration, set the tone and style the assistant uses, and adjust it per network (for example, more professional on LinkedIn, more casual on Instagram). Only users with Brand management permissions can edit this. Each Brand has its own style, so set it up individually. Instructions written in English tend to give the most accurate results, and you can reset to the defaults at any time.
The Approval Workflow
Metricool’s approval system lets others review your posts before they go live, which suits teams and clients who need to sign off on content. You can even include people without a Metricool account by adding their email. It’s available on Advanced and Custom plans, and on the mobile app.
The system uses roles to set what each person can do. The common ones are Client (view permissions, can approve or reject) and Content Creator (editing permissions, schedules posts through the approval system).
To send a post for review, create or open a scheduled post in Planning and click “Send to review.” Then:
- Select reviewers by Metricool username, or add external reviewers by email.
- Choose the approval criteria: no reviewer, at least one reviewer, or all reviewers.
- Click Send.
The post then shows on the calendar as “pending approval” in yellow, and reviewers get an email with a link to approve or reject. If one reviewer rejects, the post won’t publish.
Reviewers can act from the email link, from “My Tasks” inside Metricool, or in bulk from Planning, List, Bulk actions. A rejected post opens in the editor showing the “Rejected” status, and you can click Notes to read the rejection note and other post events.
A few common questions:
- If you edit a post after sending it for review, it returns to pending.
- If several reviewers are assigned and the criteria is “at least one,” a single approval is enough to publish, as long as no one rejects.
- If one reviewer rejects while others approved, the rejection wins and the post won’t publish.
- Reviewers added by email don’t need an account, but they get a separate email for each post.
Sharing Your Calendar with Clients
Metricool gives you a few ways to share your content calendar, depending on whether people need to view, collaborate, or approve.
| Method | Best for | Needs a Metricool account | Plan |
|---|---|---|---|
| Metricool Studio calendar view | Read-only visibility, no editing or approving | No | Starter or higher |
| Invite as team member | Ongoing access to calendar, inbox, reports, analytics | Yes | Advanced or higher |
| Export calendar (CSV) | A static copy shared externally | No | All plans |
The Metricool Studio calendar view can be shared with a public link, and it’s the only option that combines multiple Brands into one calendar.
You can generate a view straight from the Planner: configure your view, click “Generate view,” choose single-brand or multi-brand, then in the new tab click the share icon and “Generate public link.” You can also build one from Reporting, Metricool Studio, by clicking “Create new view,” selecting Calendar, choosing a period and Brands, and generating. Clients see each scheduled post as a visual preview, read-only, and a relative period like “this week” refreshes from the same URL.
For clients who need ongoing access, invite them as a team member with limited permissions. In the top menu, open User Management, click “Add user,” enter their email, select the Brands, assign a role (such as Client or a custom view-only role), and confirm. They’ll get an email to log in or create an account, then see the shared Brand with the permissions you set. Adding users is available on Advanced and Custom plans; Free and Starter include one user.
Exporting the calendar gives clients a static copy. Go to Planning, Calendar, and use the export option to download a CSV, then share it. It works on all plans and needs no account, but it’s a snapshot that won’t update as you add content.
If you need explicit sign-off on each post rather than calendar access, use the approval workflow described above. It works alongside any sharing method.
Analytics: Reading Your Metrics
Analytics is where you explore your data day to day. In general, Metricool shows post analytics no matter where the content was published, with a few network and plan exceptions.
For example, on personal LinkedIn profiles, post-level metrics are only available for content published through Metricool because of LinkedIn API limits, and on X (Twitter) Starter plans the post list only shows posts published through the planner.
Organic data is available across Facebook, Instagram, Threads, X, Bluesky, LinkedIn, Pinterest, TikTok, Google Business Profile, YouTube, and Twitch, plus ad data from Meta Ads, Google Ads, and TikTok Ads. Paid post data shows on Facebook, Instagram (you’ll need the Meta Ads account connected to see promoted data), X, and TikTok (for Business accounts using “Only show in ads”).
A few of the most consulted metrics:
- Engagement: how much people interact with your content. A core measure of whether your content lands.
- Average Reach per Post: the average number of unique people reached. Because reach counts unique people, one person viewing a post twice is one reach but two impressions. On Instagram, average reach per day covers the profile plus all posts, Reels, and Stories, while average reach per post covers only posts.
- Impressions: the total number of times your posts were shown. The same account can show more than one post to the same person, so one person can produce several impressions.
- Comparison Data: the percentage under some metrics compares with the previous period of the same length. Note that Analytics compares with the previous equal number of days, while Reports compare with full previous months, so the two can differ.
- Conversions: the number of conversions per campaign, set by your Facebook pixel configuration. The Columns button in the campaign list shows all available campaign metrics.
Metricool breaks down detailed metrics for each network individually, from your website or blog through every social platform and ad account. To compare against the wider market, pair your metrics with the Competitors section described earlier.
Reporting: Turning Data Into Reports and Dashboards
Reporting is for building, sharing, and answering deeper questions: campaign analysis, custom dashboards, AI-generated insights, and presentation-ready views. Analytics handles your day-to-day exploration. Reporting handles the polished output you hand to a client or present in a meeting.
It sits under Reporting in the top menu and includes Reports, Campaign Dashboards, Metricool Studio, and the Looker Studio connector.
Standard Reports
You can generate social media reports in seconds. Connect your accounts first so Metricool has data, then build the report. This is a Premium feature.
To create one:
- Choose the time period: a full month from the dropdown, or a custom range on the calendar.
- Select the language.
- Choose the platforms, the field to sort tables by, and the maximum number of rows.
- Optionally add your logo.
- Click download for PDF or PPT.
For the Summary section, leaving all platforms unselected creates a summary for everything, while selecting specific platforms limits it to those. Advanced and Custom plans can use their own report templates, and the Looker Studio connector handles full customization.
A note on PPT downloads: in some tools, thumbnails may not display correctly (they’re fine in PowerPoint, LibreOffice, or OpenOffice), and the background can appear as a grid (right-click the background, choose Format Background, and uncheck “Tile picture as texture”).
Reports can also go out by email each month. Add the recipient emails, an optional reply-to address, the sending day, and an optional message, then send a test and save. The email includes a download link for the PDF, and those links expire, so recipients should download promptly. Automatic reports aren’t stored in the download manager.
The download manager, under “Previous downloads,” keeps your last 10 manually generated reports so you can grab them again without rebuilding. Automatic and scheduled reports aren’t saved here.
Campaign Dashboards
Campaign Dashboards group your organic posts and paid ad campaigns under a single marketing campaign so you can analyze them together in one report. It’s built for understanding how a campaign performed across channels and sharing those results with clients in a clean view. Think of it as a way to gather all the content from one activation, run the analysis, and share the results, rather than a tagging or filtering system.
What you can do with it:
- Assign Content to a Campaign: Pick the organic posts and ad campaigns that belong to an activation. Metricool also suggests relevant posts automatically based on your campaign name and description.
- Analyze Performance: Once synced, the dashboard generates a content summary with a chart, your top 5 posts by social metrics, and AI-generated insights, all in one view.
- Share with Clients: Generate a read-only link so clients can view the live dashboard without an account, and set a custom logo per Brand.
A dashboard includes a content summary and chart, the top 5 posts by impressions or interactions (switchable), editable AI Insights, unified metrics by network and ad platform, a public share link, and collapsible sections for long reports. AI Insights need at least 10 posts to generate.
Access depends on your plan. Campaign Dashboards isn’t on the Free plan. On Starter and Advanced without the add-on, you can create up to 3 dashboards per Brand but can’t delete them. With the Advanced Analytics Add-on, you get full access across all Brands within fair use, and you can delete dashboards you no longer need.
A few things to know: each dashboard belongs to a single Brand, the maximum campaign period is 90 days, and Campaign Dashboards is desktop only (the mobile app includes Reports only).
To get started:
- Create a dashboard with a name, description, date range, and networks.
- Select posts from the suggestions or add your own.
- Click “View performance dashboard” to sync and generate the summary, top 5, and AI Insights.
- Optionally generate a public share link.
Metricool Studio
Metricool Studio is an AI-powered reporting engine that turns your social media data into Analytics Views. Using plain-language instructions or a guided mode, it builds structured reports tailored to what you ask for, like competitor analysis or year-over-year comparisons, complete with charts, tables, and AI-generated insights to help you read the numbers. It also creates Calendar Views for planning across one or more Brands, and views can be shared with a public link without a Metricool account.
You’ll find it under Reporting, alongside Reports, Campaign Dashboards, and Looker Studio. It isn’t available on mobile.
What it’s good for:
- Understand Performance Faster: Automatic charts and written summaries cover reach, engagement, followers, content performance, and more, with plain-language explanations of what changed and why it matters.
- Go beyond Standard Analytics: Mix Brands, networks, and time periods in one view, compare this February with last February, analyze competitors, and find your best posting times from your own data rather than generic benchmarks.
- Save Time on Reports: Describe what you want in plain language, reuse views instead of rebuilding them, and duplicate a view that works to tweak only what you need.
- Share Results: Generate read-only links for clients without giving full account access. Relative periods like “this week” refresh automatically.
Here’s how Studio compares with Metricool’s other data tools:
| Standard Reports | Analytics | Looker Studio | Metricool Studio | |
|---|---|---|---|---|
| Customization | Limited (logo, colors) | No | Full | Full |
| Multi-brand and comparisons | No | No | Yes | Yes |
| Works inside Metricool | Yes | Yes | No | Yes |
| AI insights and recommendations | No | No | No | Yes |
Studio and Looker Studio coexist for different needs: choose Looker Studio for full technical control outside Metricool, and Studio when you’d rather describe a report in plain language and stay inside the tool. Studio works only with data Metricool already collects, so it can’t pull from Google Analytics, a CRM, or other external sources; use the Looker Studio connector for that. You can write prompts in any language, and the report generates in that language, though some metric labels in charts may stay in their original language.
Plan access works the same way for Studio. It isn’t on the Free plan. On Starter and Advanced without the add-on, you can create up to 2 views with up to 5 versions each but can’t delete them. With the Advanced Analytics Add-on, you get full access across all Brands within fair use, with the ability to delete views you no longer need. Your access for a specific Brand also depends on your permissions for that Brand and the Reporting section.
The Advanced Analytics Add-on
The Advanced Analytics add-on extends what your base plan can do, with expanded access to three features across all your Brands: Metricool Studio, Campaign Dashboards, and Detailed Analytics (extended post performance). Unlike the X add-on, which works per brand, this one is activated at the account level and applies to every Brand connected to Metricool.
The add-on’s price depends on your plan: it starts from 10€/12$ per month on Starter and 30€/36$ per month on Advanced, and it follows the same billing cycle as your main plan, monthly or annual. You can see the exact price for your plan on the Metricool pricing page, or add it at checkout to see the full calculation before you buy. If you change your mind, you can cancel before completing the purchase.
Here’s what each plan includes, with and without the add-on:
| Feature | Free | Starter / Advanced (without add-on) | With Advanced Analytics Add-on |
|---|---|---|---|
| Metricool Studio | No access | 2 views, max. 5 versions per view | Full access with fair use |
| Campaign Dashboards | No access | 3 dashboards per brand | Full access with fair use |
| Detailed Analytics | No access | 15 days (Advanced only) | 30 days |
Starter plans also get the longer 30-day Detailed Analytics window once the add-on is active, the same window Advanced gets. Beyond that, the add-on lets you delete Metricool Studio views and Campaign Dashboards you no longer need, which isn’t possible without it.
To add the add-on:
- Click the menu icon in the top menu, then select Plans and billing.
- In the Add-ons section, find the Advanced Analytics Add-on card and click Add add-on.
- Toggle the Advanced Analytics add-on switch on.
- Click Continue and complete the payment to activate it.
Adding it takes effect immediately after payment. To turn it off later:
- Click the menu icon in the top menu, then select Plans and billing.
- In the Add-ons section, click Add add-on (or Change if you’re already on the plan change screen).
- Toggle the Advanced Analytics add-on switch off.
- Click Continue and complete the process to confirm.
Turning the add-on off takes effect on your next billing cycle, and you keep full access until the current one ends. You don’t need to cancel your subscription to remove it.
Hashtag Tracker
The Hashtag Tracker monitors the use of a specific hashtag. It isn’t part of any plan; you pay only for the time you use it, at €25 per day per social network. For every 4 days of credit you buy, you get 1 extra day free. It lives under Reporting, Hashtag Tracker, and works for Twitter and Instagram.
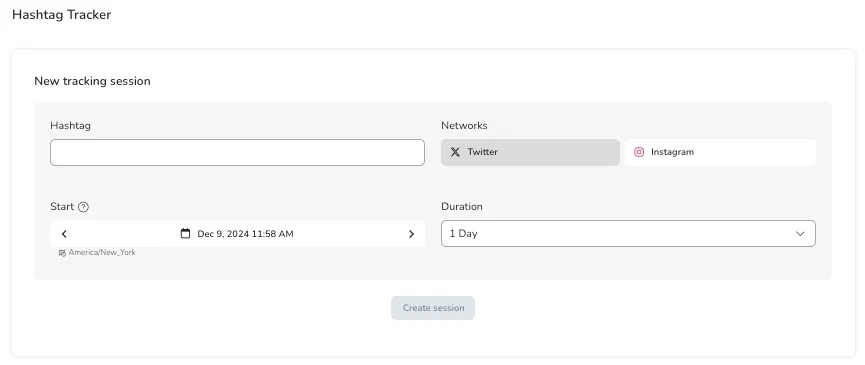
Monitoring data updates automatically every 8 hours, and you can refresh manually up to 3 times a day.
The two networks behave differently:
- Twitter: track a hashtag (with #), a keyword (no #, which also catches the hashtag), or an account (with @), and look back up to 7 days. You can track several hashtags or keywords in one session, but the data combines them. For separate data, create a session per term.
- Instagram: set up one hashtag per session (with #). Tracking starts from the day you set it up, and it only counts the hashtag in feed posts and Reels, not Stories.
To use it, you need the relevant networks connected, and X requires the X add-on. If a network isn’t connected, its tracking button is grayed out.
To start: buy your days, add the hashtag, select the networks, set a start date, choose the duration from your balance, and create the session. Each network uses a full day of balance per day monitored, so tracking both Twitter and Instagram for one day uses two days of balance. You can only cancel and refund a session that hasn’t started yet.
Data Studio Connector
Data Studio (formerly Looker Studio) is Google’s data visualization and reporting tool. It pulls data from many sources, builds interactive charts and tables, and shares reports in the cloud. With Metricool’s connector, you can add your Metricool data as a source for fully custom dashboards and client reporting.
The connector includes access to all Brands connected to Metricool, along with their websites, networks, and ad platforms. It’s available on Advanced and Custom plans. You can build reports from scratch or start from Metricool’s template, and you can turn on “Use report template in new reports” before finishing a data source. To get going, find your token in Metricool, create your data source in Data Studio, and build from there.
Inbox: Managing Messages and Comments
Metricool’s Inbox brings messages and comments from your networks into one place for reading and replying. It’s built for responding to your audience. You can’t delete or hide comments and messages from Metricool, so those actions have to happen in each network’s own app.
What you can reply to, by network:
- Facebook: comments and private messages.
- Instagram: comments and private messages from the main inbox.
- TikTok: comments (Business accounts only).
- X: private messages.
- LinkedIn: comments (company profiles only).
- Google Business Profile: reviews.
- YouTube: comments on long and short videos.
Messages are grouped into three tabs:
- Unresolved: everything pending. Mark a message resolved with the check on the right to move it to All.
- Unread: messages you haven’t opened. Reading one moves it to All.
- All: everything, read or not.
Click a message on the left to open the conversation on the right. For a direct message, you’ll see the full thread and can reply with text, emojis, an image, video, or GIF. For a comment, Metricool shows the related post first so you know what it’s about. Click a user’s avatar to open their profile where the network allows it (Instagram, TikTok, YouTube, and X support this; Facebook, LinkedIn, and Google Business Profile don’t).
You can filter the Inbox by network, by message type (comment, direct message, or Google review), and by user through the search bar. To speed up manual replies, use saved replies: reusable templates with text and tags you can drop in while typing.
SmartLinks: Your Link-in-Bio Page
SmartLinks let you create a single page that holds one or many links, with buttons, images, and icons that point to other sites or your profiles. They’re built for profiles that allow only one bio link, like Instagram or TikTok, where you place your SmartLink to gather everything in one spot.
From the SmartLinks section in the top menu you can create, edit, and manage SmartLinks and review their analytics.
To create one: go to SmartLinks, click “Create SmartLink,” and enter a name in the URL field. The page is generated at the domain t.mtrbio.com, and you customize the final part. The URL can use letters, numbers, and hyphens, but it can’t begin or end with a hyphen. Click Save, and you’ll land on the editing screen.
You edit a SmartLink across several tabs:
- General: edit the internal name (visible in your list), edit and view the public URL, and copy the link. You add the link to your Instagram bio or wherever you want it manually.
- Header: add an optional image or your logo (a 1:1 to 2:1 aspect ratio works well, and horizontal logos are supported), plus a title and subtitle.
- Buttons: add up to 100 buttons pointing to different links, organize them into sections, set text, color, background, and border, disable, clone, or delete them, and drag to reorder.
- Icons: add social media icons that send people to your profiles by entering each URL.
- Media: include clickable photos and videos that link to a URL, uploaded from Instagram or your computer (up to 50 files, with the most recent 50 shown if you go over). The “Add from Instagram” option shows your latest 50 posts.
- Appearance: pick a preset theme or set text and background colors, typography, button styles, icon position, spacing, and the featured image yourself.
Every change shows in the real-time preview panel on the right. Once the SmartLink is created and published, the “View live” button lets you see it in the browser. Remember to click Save when you’re done.
Ads: Creating and Managing Campaigns
The Ads section lets you manage campaigns on Meta Ads, Google Ads, and TikTok Ads. You’ll see a table of every campaign you’ve run, structured into Campaigns, Ad Groups, Advertisements, Keywords (Google Ads), and Recommendations (Google Ads).
From the campaign table, the top bar lets you search by keyword, set a time range, refresh the data, filter by status, platform, or objective, and customize the columns shown. You can update daily or lifetime budgets by clicking the amount, and turn campaigns, ad groups, or ads on and off.
To create a campaign, go to Ads and click “Create campaign,” then work through the flow. You’ll need the Meta Ads pixel configured in your account beforehand for Meta campaigns.
- Set up the campaign: name, landing page URL, platform, objective, and ad location.
- Add locations.
- Segment your audience by gender, age, and language.
- Choose audience interests (optional, but it helps target the right people).
- For Google Ads only, add related keywords (optional, ideally 10 to 30, and they’re saved for future campaigns).
- Design the ad: pick the photo and logo, add the company name, title, and description, and preview how it looks per network. Metricool shows the recommended image and logo sizes as you build. Only image uploads are supported for now, not video.
- Set the budget (total or daily), choose manual or automatic bidding, and set the duration. Meta and Google may require a minimum (for Meta, usually 1 USD). In the EU and associated countries, the beneficiary and payer fields are mandatory.
- Review the summary and click “Create Campaign.”
To finish, Metricool asks you to confirm with a verification code sent to your email. After that, the campaign goes to Meta or Google for review. You can pause, reactivate, or withdraw a campaign anytime from Ads, Campaigns, Status.
Connecting Other Tools to Metricool
Metricool connects to design tools, AI clients, and automation platforms so you spend less time switching between tabs. The integrations split into two groups: the ones you use while planning content, and the ones that automate work or bring in AI.
Design and Media Tools in the Planner
You can pull media into your posts from three tools, all from the multimedia icon in Planning.
Canva (Premium plans) and Google Drive (Premium plans) both let you connect your account, then attach files by dragging them from media storage to the calendar or by selecting the tool when you create a post. For multi-page Canva designs, exporting as an image lets you pick which pages to include, while MP4 or GIF combines all pages into one video.
One thing to keep in mind with Drive: the connection is personal even on shared Brands, so use shared Drive folders if you want collaborators to reach the same files.
Adobe Express (all plans) goes a step further: you can create and edit visual content without leaving the planner. Design new images and videos, or edit an image you’ve already added by clicking the three dots on it and choosing “Edit with Adobe Express.” Video editing isn’t available yet, so use the Metricool editor for that.
Metricool Chrome Extension
The Chrome extension helps you plan or publish content you find while browsing. It isn’t a full planner, but it’s handy for grabbing something interesting from the web. Install it from the Chrome Web Store, then click the extension icon to jump to Metricool with the current link added, or select text on a page, right-click, and choose “Share with Metricool” to start a post with that text and link. You can share content the same way from the mobile app.
Metricool MCP: Working with AI Clients
The Metricool MCP connects your account to an AI client like Claude so you can analyze data, create content, and schedule posts right in your chat. Instead of a generic answer to “how’s my content doing,” the AI pulls your real numbers and replies with specifics, like how this week’s Reels compared to last week’s.
Through the MCP you can do the following, all from a prompt:
- Check metrics like followers, engagement, and reach.
- Analyze posts by platform and format.
- Compare time periods.
- Review your competitors.
- Schedule and edit posts, even auto-translated into multiple languages.
- Get your best posting times.
It works with any plan, including Free, and your plan’s limits carry over (a Free account can’t query data older than 3 months or schedule more than 20 posts).
Connecting the MCP gives the AI tool the same level of access as logging in directly, so it can view and manage your Brands, metrics, and posts. Only authorize it in tools you trust, and you can revoke access anytime from your account settings. Setup steps vary by client, so follow the guide for the tool you’re using.
Automating Work with Make and Zapier
Make and Zapier let you automate tasks between Metricool and the other apps in your stack, like building a post automatically whenever a new row lands in a Google Sheet. Both run on Metricool’s API, so they need an Advanced or Custom plan and your API key from Account Settings.
Once connected, you can set up triggers and actions. Common triggers include a new scheduled, published, or failed post, a new Inbox conversation, and a new Google Business Profile review. Actions include scheduling a post, adding one to an autolist, and replying to a message or review.
One thing to note: you can’t schedule threads through either tool, and any media you reference needs a public URL so Metricool can reach it at publish time.
Metricool Mobile App
The Metricool app is available for Android (version 8 or higher; devices on Android 10 or lower are no longer fully compatible) and iOS (version 14 or higher). If you already have an account, download the app and log in. If you don’t, you can register from the app itself.
The app is organized into a few blocks:
- Analytics: where you land. See your metrics, connect a network, and download or review reports, with a brand switcher in the top right.
- Inbox: works like the desktop version for replying to comments and messages.
- Planning: review scheduled posts by day, week, or month, and tap a post to edit it, change its status, or delete it. Tap the plus button to create a new post (files up to 500 MB).
- Settings: Brand settings, account settings, device settings, app info, and direct access to the help center and live chat.
The app is built for managing your networks on the go, with some advanced features kept to the web for a fuller experience.
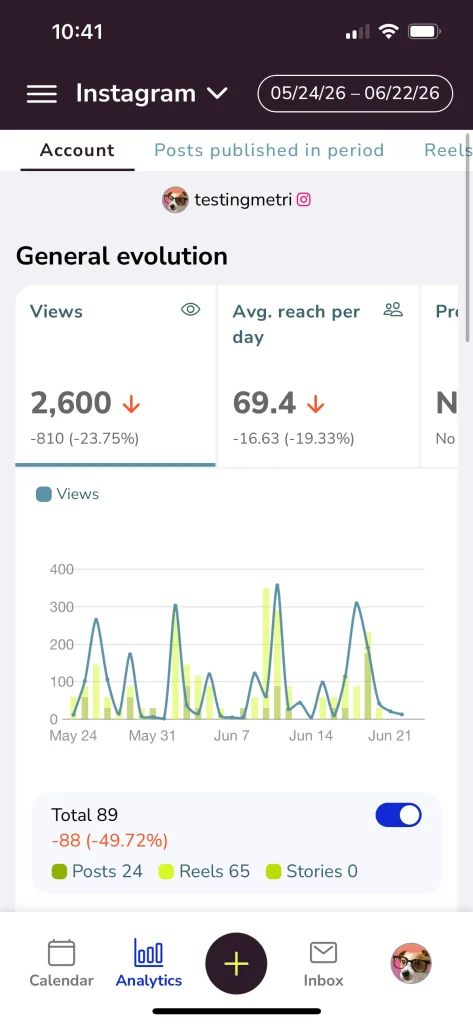
The two platforms work best together: plan and analyze on desktop, and handle day-to-day tasks on mobile, with everything syncing automatically.
Reach for the app to publish on the go, reply quickly to messages, check basic metrics, reschedule posts, and receive push notifications to publish content that doesn’t support auto-publishing (like some Instagram and TikTok posts). Use the web for strategic planning with templates and recurring posts, in-depth analysis of performance, competitors, and hashtags, SmartLinks, ad campaigns, report templates, the AI scheduling assistant, and managing roles and permissions.
Metricool Affiliate Program
The Metricool Affiliate Program lets you earn a commission when new users sign up for a Premium plan through your link. It has two tiers. Metricool Associates earn 25% of each referred subscription, up to $100 per user. Metricool Partners earn 50% of each referred subscription, up to $300 per user.
You move from Associate to Partner by generating 200 paid subscriptions through your link. To stay a Partner, generate 100 more paid registrations within 12 months of your 200th conversion; if you don’t, your status returns to Associate, and you can return to Partner anytime by reaching 200 again.
Your affiliate dashboard holds your unique link, link performance, payment info, and a Resource Hub with graphics, tutorials, logos, and branded assets. The dashboard is divided into five tabs: General, Settings, Stats, Payments, and Resources.
Payments run through the partner Zexel. Register with Zexel using the same email as your Metricool account, reach a minimum of $200 in earnings to start a payout, and payments are issued once a month.
Where to Go from Here
You’ve now got the full picture: setting up Brands and connections, planning and publishing across every network, reading your analytics, building reports and dashboards, managing your Inbox, creating SmartLinks, running ads, and connecting Metricool to AI and automation tools.
Pick the workflow you need most, set it up, and build from there. As your routine settles in, the parts you skipped at first, recurring posts, Campaign Dashboards, the MCP, will be waiting when you’re ready for them.
