How to Delete a Stream on Twitch
 Emerson Tyler
23 February 2021
Emerson Tyler
23 February 2021 
Figuring out how to delete a stream on Twitch is a common dilemma, especially as the platform continues to grow with roughly 240 million monthly users. Whether you’re cleaning up older broadcasts, protecting your channel from copyright issues, or simply curating a more polished presence, knowing how to manage your Twitch content is essential.
Thankfully, Twitch doesn’t make deletion overly complicated, but the process isn’t always obvious. This guide breaks it down step by step, along with smart alternatives if you’re not quite ready to hit delete.
Top Reasons for Deleting a Stream on Twitch
Before diving into how to delete a stream on Twitch, it’s worth taking a closer look at why creators are choosing to remove content in the first place. Managing your Twitch channel isn’t just about going live. It also involves reviewing past broadcasts and deciding what still aligns with your brand and goals. For many streamers, deleting Twitch videos becomes part of maintaining a professional presence that reflects the quality viewers expect.
Whether you’re refining your content strategy, avoiding potential copyright issues, or simply cleaning up older uploads, regularly auditing your videos can make a noticeable difference in how your stream is perceived. Recognizing the reasons for deleting a clip can help you decide when to delete a stream instead of just editing or keeping it.
Top reasons for deleting a Twitch stream may include:
- Copyright concerns
- Poor stream quality due to lag or technical issues
- Negative or inappropriate chat interactions
- Branding or content strategy changes
- Removing outdated or irrelevant content
Understanding Twitch VOD (Videos on Demand)
Before you start managing or removing content, it’s important to understand how Twitch stores your streams. Twitch automatically saves your broadcasts as videos on demand, giving you the option to revisit, edit, share, or remove your streams later. These saved videos play a key role in content strategy, especially if you want to repurpose streams or maintain a polished channel archive.
It is crucial to note that not all content on Twitch is treated the same, but several types of videos can be managed or removed:
- Past broadcasts (automatically saved streams)
- Highlights (edited segments of streams)
- Uploads (manually uploaded videos)
How Long Do Twitch Streams Stay On Twitch?
Twitch doesn’t store VOD’s indefinitely, and how long your streams remain available depends on your account type. For regular users, past broadcasts are saved for 7 days, while Twitch affiliates get 14 days of storage.
If you’re a partner or have Twitch Turbo or Prime, your streams can stay available for up to 60 days. Keeping these timelines in mind is important, as it helps you decide when to review, edit, or take action before your content is automatically removed.
Steps to Delete a Stream on Twitch
If you’re ready to clean up your channel, learning how to delete a stream on Twitch is a quick process once you know where to look. Twitch organizes all your past broadcasts inside the Creator Dashboard, making it easy to find, manage, and remove videos in just a few clicks.
Follow these step-by-step instructions to permanently delete a stream from your account:
- Log in to your Twitch account
- Click your profile icon in the top-right corner
- Select Creator Dashboard from the dropdown menu
- Navigate to Content → Video Producer
- Locate the stream you want to delete
- Click the three-dot menu next to the video
- Select Delete
- Confirm the deletion when prompted
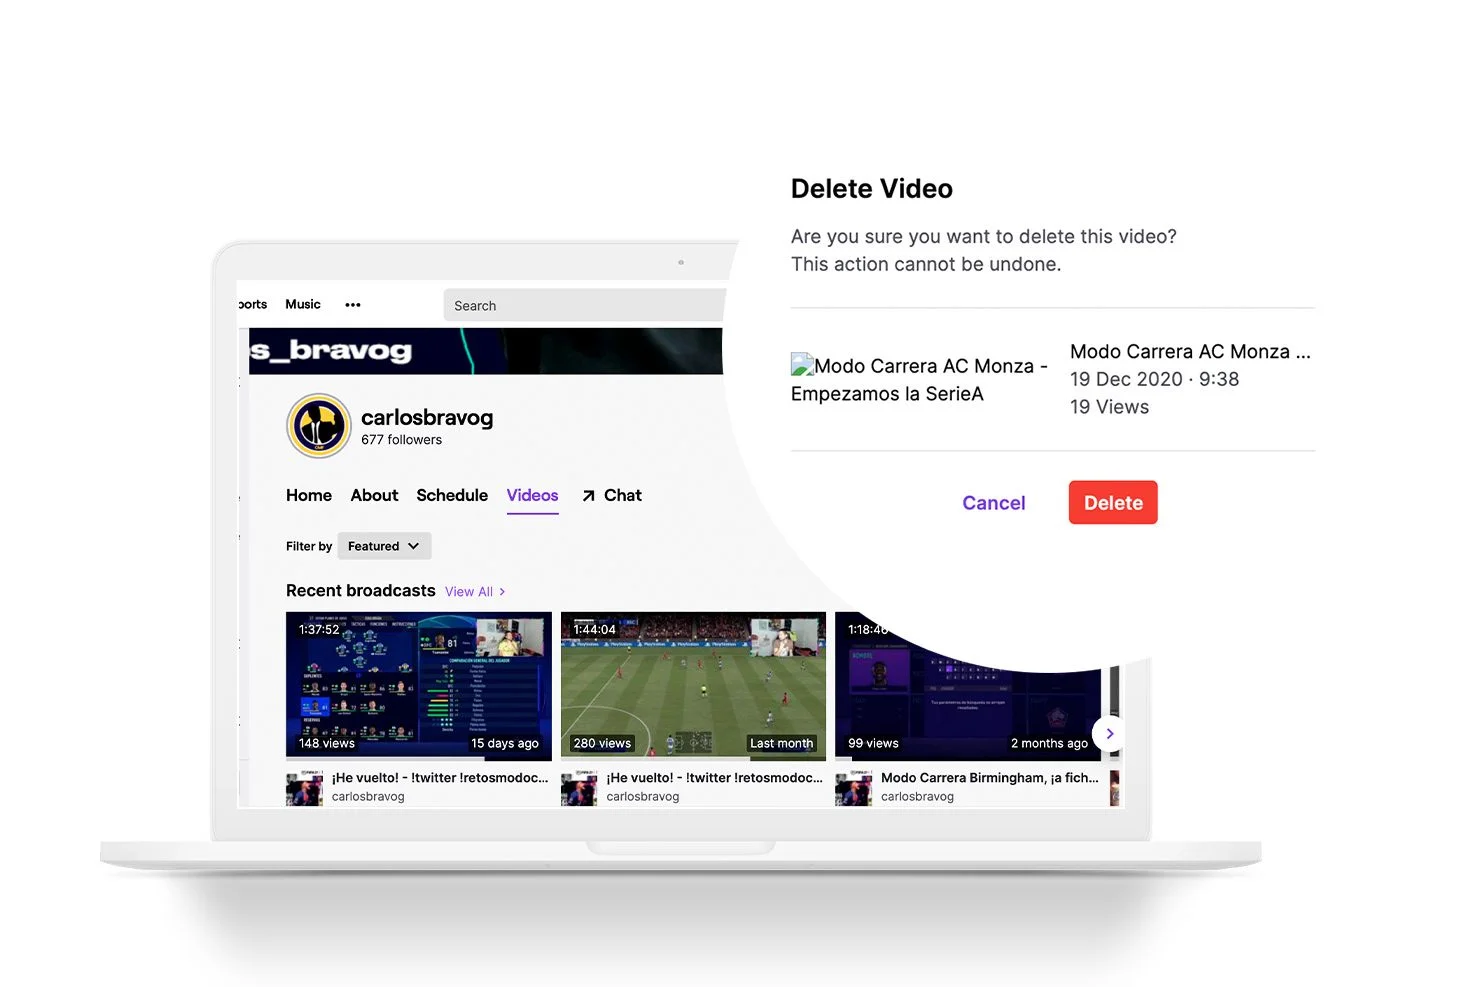
Once deleted, the stream is permanently removed and cannot be recovered, so make sure you’ve selected the correct video before confirming.
Can You Delete Clips on Twitch?
Twitch clips are short, shareable moments taken from your live streams. Viewers and creators alike can create clips to capture highlights, whether it’s an impressive play, a funny reaction, or a memorable interaction. These clips can help boost visibility, drive subscribers to your channel, and be repurposed for other platforms such as YouTube Shorts or TikTok posts. However, these clips don’t always align with your content goals. Since clips exist separately from full streams, they need to be managed and deleted through a different section of your account.

If you want to remove a clip, the process is simple:
- Go to your Clips Manager in the Creator Dashboard
- Select the clip you want to remove
- Click the trash can icon
- Click Delete and confirm the deletion
Alternative to Deleting the Video
Before you commit to deleting a stream, consider whether a quick edit could solve the glaring issue. In many cases, trimming or adjusting parts of your broadcast lets you keep valuable content without having to start from scratch.
Editing is especially useful if only part of the stream has issues, you want to keep standout gameplay moments, or you plan to repurpose clips for other platforms. Instead of removing the entire video, you can refine it to better match your content goals.
Twitch offers several built-in editing tools that let you improve your streams without deleting them. Here’s what you can edit on your Twitch stream:
- Trim the start or end of a broadcast
- Cut out specific sections of a video
- Create highlights from longer streams
- Update titles, descriptions, and categories
- Adjust thumbnails for a more polished look
Best Practices for Managing Twitch Content
Keeping your Twitch channel organized goes beyond knowing how to delete videos. It’s about building a content library that reflects your brand and keeps viewers engaged. With a more intentional approach, you can reduce the need for deletions while improving overall performance.
A consistent review process helps you maintain control and quality across your channel. Regularly review past broadcasts, remove low-performing or overly risky content, highlight your best moments, and optimize titles and descriptions to improve discoverability.
Use these tips to avoid future deletions of your streams and short-form content:
- Use copyright-free music
- Test your stream setup before going live
- Moderate chat effectively
- Monitor stream quality in real time
Manage Your Twitch Streams With Metricool
Keeping your Twitch content organized is just one piece of a bigger content strategy. With Metricool, you can plan, analyze, and optimize all your social media and streaming performance without constantly switching platforms.
From tracking which streams perform best to scheduling your social content across channels, Metricool helps you focus less on manual tasks and more on creating content that grows your audience. Sign up for your Metricool account and start streamlining your workflow today.
