Meta Business Manager Tutorial 2025
Previously known as Facebook Ads Manager, Meta Business Manager is an all-in-one tool for creating and managing your Facebook and Instagram ads. As social media ads continue to be integrated into strategies, Meta Business Manager is another mechanism by which you can regulate and run your social media ads.
Before I dive into how this works, you’re probably wondering, what is the Meta Business Manager platform and how does it work? Let me tell you.
What is Meta Business Manager?
Meta Business Manager is a central hub for your Facebook and Instagram ads, where you can create and manage your campaigns and analyze their results.
If you’re looking to grow your business or brand, Facebook Ads Manager will help you build smart and effective campaigns, targeted towards your specific audience.
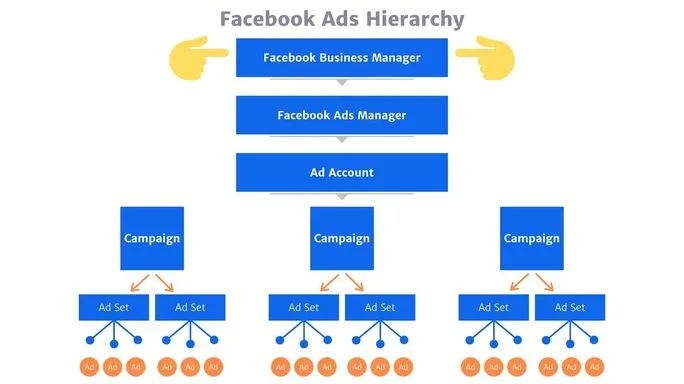
In the infographic below, you can see that Facebook Business Manager sits above Facebook Ads Manager (now Meta Ads Manager), meaning that this Facebook Business Manager allows you to conduct all functions for Facebook including managing multiple pages, running ads, etc. So, to access Meta Business Manager, you first need to create a Facebook Business Manager account.
So then, what can you do with Meta Ads Manager?
Meta Business Manager features include:
- Creating new campaigns
- Managing advertising campaigns
- Changing your ad budget
- Setting and adjusting your target audience
- Tracking your campaign performance
- Testing your ad campaigns
After campaigns have been launched, you can edit or change details without a problem. Meta Ads Manager is available both on desktop and mobile versions, making it easy to launch ads from any place and time.
How to Access Meta Business Manager
Now that you’re somewhat familiar with the purpose of Meta Business Manager, I’m going to explain how you can find this platform and set up your account.
It’s important to know that you can either access this platform on the web version here, or by downloading the Meta Ads Manager app, available on iOS and Android devices.
First things first, you must create a Facebook Business Manager account. In order to do this, you need to have a personal Facebook account. After creating your account, you will be prompted to enter in details such as the name of your business, work email address and your name.
Now, before creating a campaign, you must manage at least one Facebook page. Once you have a page, you will automatically have a Business Manager account. Remember that this Facebook page should be associated with your Business Manager account, so you can access everything properly.
Lastly, you need to enable advertising access on your account. To do this:
- Open Business Manager Settings.
- Go to People and Assets, and click on “Ad Accounts”.
- Select “Add New Ad Accounts” and then “Create a New Ad Account”.
You will then be prompted to enter your payment and billing information.
How to Use Meta Business Manager
When you log in to your Facebook business account, access the page that you want to run campaigns for. When on the Facebook homepage, you will see a left-hand side menu, with an Business Manager section. This will take you to your Account Overview, showing active campaign trends, and information.

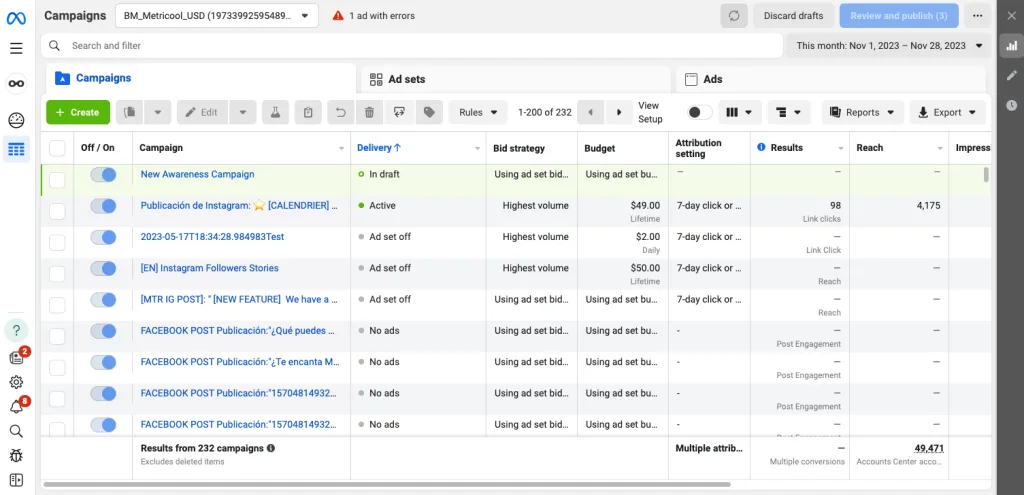
You will also see another tab called “Campaigns” where you can see a list of your active and past campaigns more in depth, make any edits, or create new ads.
Here comes the best part, creating your ad! If you’re ready to launch your first campaign, follow these following steps and get down to work with perfecting that ad.
To create an ad, click on the green icon labeled, “Create.”
Creating your Facebook and Instagram Ads
Creating ads can seem overwhelming, but we are here to help you break it down step by step, so you can replicate this for your campaigns.
Create campaigns and ad sets
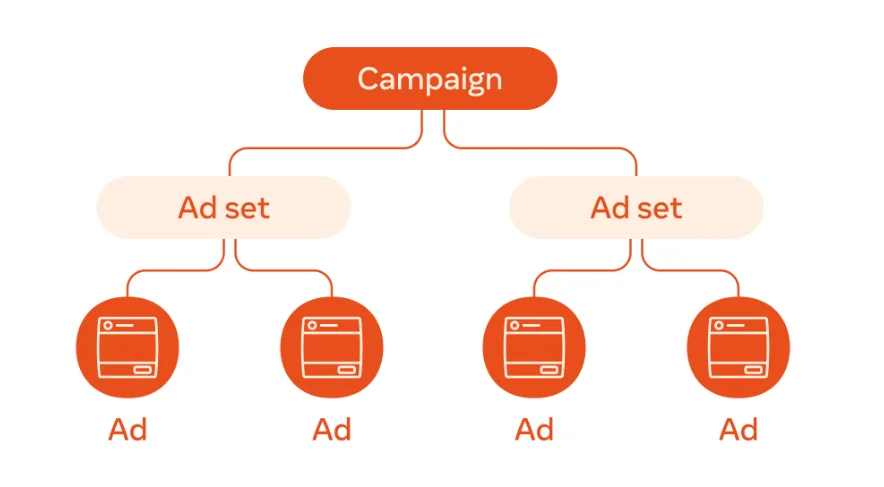
When you first click on “Create” a new window will pop up, prompting you either to “Create a new campaign” or “New ad set or ad”. When you run a new campaign, it are made up of “Ad sets” that have the same settings on how and when they are distributed. Facebook lays out a nice diagram of what this flow looks like:
Buying type
This option allows you to choose “Auction” and “Reservation”, previously reach and frequency. This allows you to forecast your campaign’s results with a set cost.
Choose an Ad objective
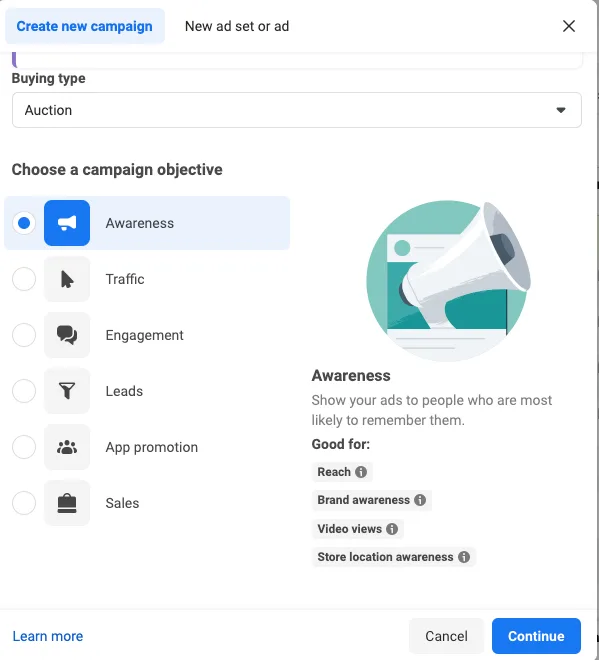
After selecting “Create”, open a new window, “Create new campaign.” This is where you will set an objective for your campaign from the following categories:
- Awareness: Create brand awareness, increase reach, and increase video views.
- Traffic: Increase traffic to an online destination (Facebook or Instagram shop, business website, app).
- Engagement: Increase engagement of your business online, increase video views, and messages, and reach potential customers.
- Leads: Collect leads for your business through messages, phone calls, or sign-ups.
- App promotion: Get people to install or take action within your app.
- Sales: Increase conversions and catalog sales.
After selecting your campaign objective, you will be asked to name the campaign. Make sure this is clear and easy to understand for your audience.
💡METRI TIP: Don’t know which objective to select? Highlight each option in Business Maanager, and view the “Good for” pointers. This will help you decide what your campaign goals are.
Campaign information
First and foremost, you need to give this new campaign a name. Then, you need to select which categories describe your campaign best, among the following:
- Credit
- Employment
- Housing
- Social Issues, elections, or policies
Below this, you will see your Campaign details, including the Buying type and Campaign objective that you just chose. You can edit these here if needed.
Do you want to turn on A/B testing? Toggle on the Create A/B Test, so that you can test different images, text, audiences, etc., to see what works best.
Set your campaign budget
Now it’s time to choose how much you want to spend on your ad. The figure that you enter is the maximum amount of money you are willing to spend for the campaign. There are two different ways to set your budget:
- Daily: This is a limit of how much you spend each day on your ads. From here, Facebook will find the right place and time to show your campaign to the targeted audience. After the limit has been reached, the ad will end for that day and will start over the next day.
- Lifetime: This is the budget for the entirety of the campaign. After giving an end date to your campaign, the money will be spent based on ad performance. Once all the money is spent, your campaign will end.
Once you select your budget, you also need to select your Campaign bid strategy, so what you expect to gain from this, either “Highest volume”, “Cost per result goal”, or “Bid cap.”
Budget scheduling
In Meta Ads Manager, you now have the option to schedule budget increases on certain days if for example you expect a higher sales day, or have increased traffic.
Create new ad set
This is where you will start building your different ad versions, underneath your campaign. You can also have just one ad. The platform will ask you for some more information including:
- Ad set name: This will need to choose a name for this specific ad set. For example, say these are all the ads you are running as Instagram feed post ads.
- Conversion location, or Facebook page: Select which landing page or Facebook page you want to use to direct traffic, or drive sales.
- Performance goal: Here you will include what your overall goal is, whether that’s maximum clicks, sales, etc.
- Cost per result goal: If you’re expecting a certain cost per result, then you can add it here. If you aren’t sure, you can look at previous campaigns, or leave it blank. When left blank, Meta will try to spend your entire budget and use a high-volume bid strategy to get the most 1,000 impressions.
- Budget and schedule: In this section, you will select a start date for this ad to go live, and an end date if you want. Scheduling ads with a lifetime budget can change the dates, so make sure you are aware of this.
Establish your target audience
When creating audiences to present your ads to, you want to make sure to segment and finely target different users. You have a few options when it comes to creating and choosing your audience for campaigns:
Create new audience
The first option is to customize your audience based on who you want to see this ad. Thus, you will need to choose the following demographics:
- Location
- Age
- Gender
- Languages
- Interests
- Behaviors
In the Detailed targeting section, you can search and select demographics, interests, and behaviors to better narrow your audience.
Use saved audience:
To make it easier for the future, you can also save these customized audiences. As you create more ads, you can utilize these saved audiences.
Determine Ad Placements
In this next step, you will choose where your ad will appear for your audience. These placements can include Facebook, Instagram, Messenger, or the Audience Network. There are two different audience selections you can choose from.
Advantage+ placements
This allows you to have automatic placements, where Facebook chooses placements to achieve maximum results at the lowest average cost. Your ad will appear across different placements based on where they are more likely to succeed.
Manual placements
Alternatively, you can also choose placements, including the following options:
- Feeds: Facebook Feed, Instagram Feed, Facebook Marketplace, Facebook video feeds, Facebook right column, Facebook Business Explore, Instagram Explore, Instagram Shop, and Messenger Inbox.
- Stories and Reels: Facebook Stories, Instagram Stories, Messenger Stories, Instagram Reels, Facebook Reels
- In-stream ads for video and reels: Facebook in-stream videos, ads on Facebook Reels.
- Search results: Facebook Search Results.
- Messages: Messenger sponsored messages.
- Apps and sites: Ads in external apps and messages.
Create your Ad
Here is where you can finally let your creativity fly! In this final section, you will be creating the face of your campaign. You can either do this from an existing post, or by starting from scratch. You also need to create a name for this ad, identify which Facebook page this is associated with, and then setup the ad.
Do you want to show content as a single image or video? Carousel? Or Collection?
This next part is the Ad creative section, where you will upload your beautiful ad. Select the media you want to use, and add a primary text. You can choose to add a destination if you wish.
The last option is Tracking, where you can track event datasets in case you want to track conversions. You can also add URL parameters, and view tags.
Then, once your ad is finished, you can select Publish and see a review of the ad before having it go live.
Meta Business Manager Reporting
After launching your advertisements, you can return to the Account Overview page to view a summary of your ad account and see your ad performance. This dashboard will show key metrics of your active or recent campaigns, as well as other information about your account.
This page will also show alerts, recommendations, campaign trends and any pending tasks.
This tool is useful for analyzing campaign results and understanding more about your audience. You can use this data to tweak your strategy and continue to improve your marketing decisions.
Now you know all about Meta Ads Manager and how it works, so you can start creating and running productive campaigns for your brand or business.
Want more information about how to excel in marketing on Facebook? Read this guide below 👇👇

