Meta Business Suite Tutorial: How to Manage Your Instagram, Facebook, Messenger, and More
 Anniston Ward
07 January 2026
Anniston Ward
07 January 2026 
If you manage Facebook or Instagram for your business, you’ve probably heard of Meta Business Suite. It’s Meta’s official tool that brings everything together in one place. You can schedule posts, reply to messages, check analytics, manage ads, and organize your team without switching between different apps.
This guide walks you through how it works, how to set it up, and how it differs from other Meta tools like Business Manager and Ads Manager. You’ll also see how using it alongside Metricool helps you manage all your social media accounts more efficiently.
What is Meta Business Suite?
Meta Business Suite is a dashboard for handling your Facebook and Instagram activity. It combines tools for:
- Scheduling and publishing posts or Stories
- Responding to comments and messages from one inbox
- Managing ads and budgets
- Reviewing performance analytics
- Assigning team permissions and roles
It’s a practical solution for creators, small businesses, and agencies that want to manage Meta platforms more easily.
How Does Meta Business Suite Work?
Here’s a quick overview of what you can do with Meta Business Suite:
- Centralized Control: Access all your business assets, including Facebook Pages, Instagram accounts, and ad accounts, from a single dashboard.
- Content Management: Create, schedule, and publish posts or Stories to Facebook and Instagram at the same time.
- Unified Inbox: View and reply to messages and comments from Facebook, Instagram, and Messenger in one place. You can also add labels or set up automated replies to stay organized.
- Ad Management: Run basic ads directly or open Ads Manager for more detailed campaign tools like A/B testing.
- Analytics Dashboard: Track organic and paid results, including reach, engagement, and audience growth.
- Team Permissions: Give different roles to team members so everyone has the right level of access.
How to Set Up and Begin with Meta Business Suite
Setting up your account is straightforward:
- Visit business.facebook.com and sign in with your Facebook account.
- Click “Create Account” and add your business name and contact details.
- Connect your Facebook Page and Instagram account, or create them if you don’t have them yet.
- Complete your business profile by adding a logo, cover image, and contact details.
- Turn on two-factor authentication for security and invite your team.
Once everything is connected, you can start scheduling content and tracking your results.
Meta Business Suite: Main Features and Benefits for Brands
Meta Business Suite is a practical, user-friendly hub for managing Facebook and Instagram. It brings together publishing, messaging, analytics, and advertising tools in one place, making it easier for brands to stay consistent across Meta platforms.
Below is a full overview of its main features, useful practices, and a few limits to keep in mind.
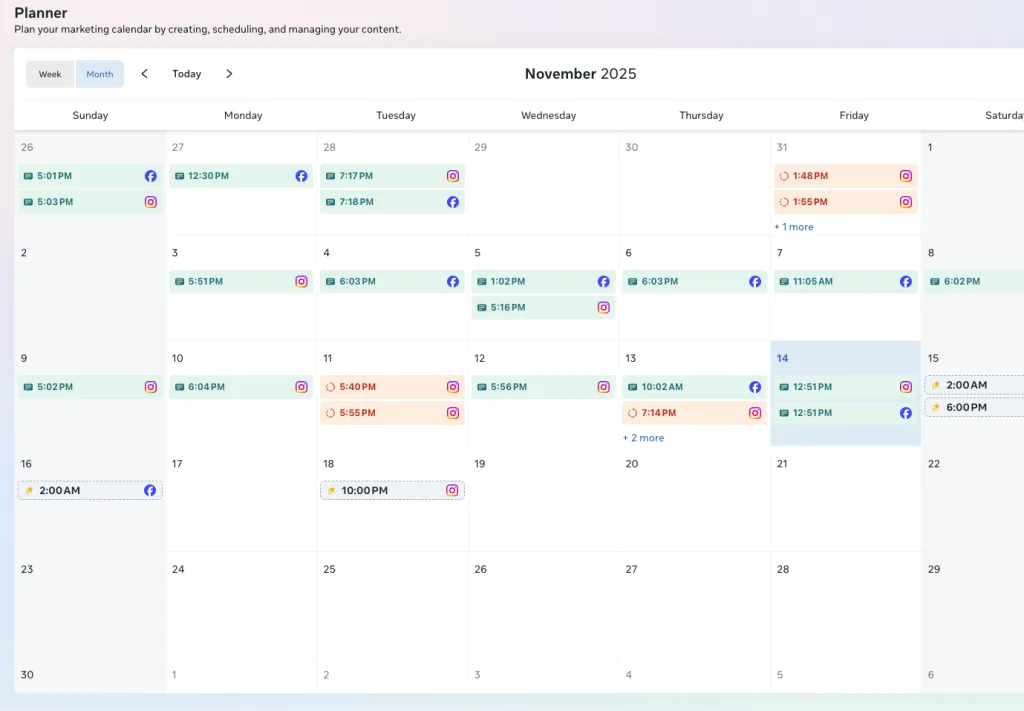
1. Content Planning
Meta Business Suite allows you to plan and schedule posts, Stories, and Reels for both Facebook and Instagram.
You can use a drag-and-drop calendar, preview posts before publishing, and review recommended posting times to reach your audience more effectively. Smart scheduling tools help teams stay organized and adapt quickly when new trends appear.
2. Unified Inbox
Messages and comments from Facebook, Instagram, and Messenger all appear in one central inbox.
You can assign conversations to specific team members, set up automated replies, and organize everything with quick labels. The system also highlights priority messages so customer support and engagement tasks are easier to manage.
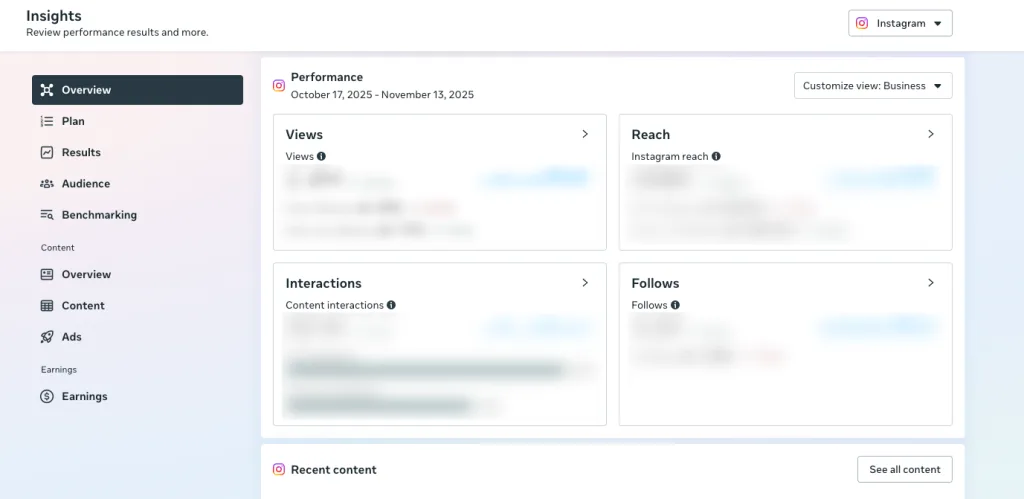
3. Analytics and Insights
Meta Business Suite offers real-time data on reach, engagement, audience growth, and ad performance.
Its analytics make it simple to compare how content performs across Facebook and Instagram, identify audience trends, and evaluate your results. While the insights are helpful for day-to-day tracking, they remain basic compared to more advanced reporting platforms.
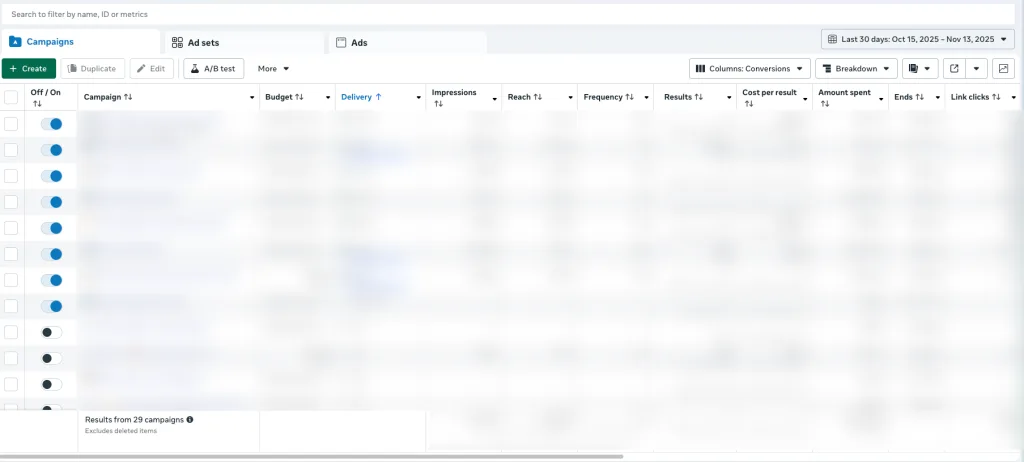
4. Ad Management
You can boost posts or create simple ad campaigns aimed at Facebook and Instagram audiences.
For more advanced options such as A/B testing, Advantage+ automation, or detailed targeting, Meta Business Suite connects directly to Meta Ads Manager, where you can set up and monitor larger campaigns.
5. User Management
Meta Business Suite allows brands to add or remove users and assign different roles, such as admin, editor, or analyst.
Approval workflows and permissions help teams maintain secure access and follow internal content or advertising guidelines.
6. Lead and Sales Tools
Meta Business Suite includes built-in forms and booking tools that help brands collect leads directly from social ads.
E-commerce features let you create shoppable posts, sync product catalogs, and track how your social content contributes to sales.
7. Mobile App
The Meta Business Suite app for iOS and Android lets you manage posts, messages, and performance data from your phone.
You can engage with followers, post updates, or run simple ads while away from your computer.
Meta Business Suite Limitations
Meta Business Suite is useful, but it does have limits:
- Limited Platform Support: Meta Business Suite only supports Facebook, Instagram, Messenger, and partially WhatsApp. You need other tools like Metricool to manage platforms including Threads, TikTok, LinkedIn, X (Twitter), Pinterest, or YouTube.
- Basic Automation: Its scheduling and automation options are solid but limited compared to dedicated social media tools like Metricool. The automation works well for basic workflows but lacks advanced customization.
- Reporting Depth: Analytics are useful for an overview but do not include advanced reporting features such as cross-platform comparisons, multi-channel attribution, or detailed exports. For deeper ad analysis, you will need to use Meta Ads Manager or Metricools customizable reports.
- Frequent Updates: Meta regularly changes the interface and available features, so users need to stay familiar with updates and new layouts.
Meta Business Suite vs. Meta Business Manager vs. Ads Manager: Which Should You Use?
These three Meta tools often get confused, so here’s how they differ:
| Tool | Main Purpose | Old Name | Different From |
| Meta Business Suite | Daily social media management like posting, scheduling, messaging, and insights | Facebook Business Suite | Business Manager, Ads Manager |
| Meta Business Manager | Manages permissions, settings, and assets for your business accounts | Facebook Business Manager | Business Suite, Ads Manager |
| Meta Ads Manager | Focused on creating, managing, and analyzing ad campaigns | Facebook Ads Manager | Business Suite, Business Manager |
To summarize:
- Business Suite is where you post and manage interactions.
- Business Manager is where you set up and manage access.
- Ads Manager is where you handle advertising campaigns.
They are separate but connected, each covering a different part of your Meta presence.
Metricool for All-in-One Social Media Management and Marketing
Meta Business Suite helps you manage Facebook and Instagram efficiently, but many brands work across several networks. Metricool fills that gap by covering multiple platforms and providing deeper analytics.
Here’s what Metricool adds:
- Multi-Platform Scheduling: Manage Facebook, Instagram, TikTok, X, LinkedIn, Pinterest, YouTube, Bluesky, Threads, and more from one dashboard.
- Advanced Analytics: Access detailed cross-channel reports with best times to post information, hashtag analysis, competitor tracking, and UTM monitoring.
- Consistent Campaign Planning: Organize campaigns across different platforms and keep messaging consistent.
- Meta Ads Integration: Track and analyze ad results from Meta alongside your organic content.
Using both tools together helps you stay organized and make smarter, data-driven decisions. Meta Business Suite focuses on daily operations within Meta, while Metricool expands your reach to every platform you use.
Meta Business Suite FAQ
What is the difference between Facebook Business Suite and Meta Business Suite?
Facebook Business Suite and Meta Business Suite are the same tool. Facebook Business Suite was the original name before Meta rebranded its platforms. When Facebook and Instagram were unified under Meta, the management tool was renamed Meta Business Suite. The features and functions remain the same, only the name changed.
Does Meta Business Suite include Threads Management?
No, Meta Business Suite does not currently include management for Instagram Threads. However, Metricool allows you to schedule, plan, and analyze your Threads post alongside all your other social media platforms.
Is Meta Business Suite free?
Yes, Meta Business Suite is free to use. You can schedule posts, reply to messages, and view analytics for Facebook and Instagram without any cost. If you decide to run ads, you will need to pay for your advertising budget through Meta Ads Manager.
Who should use Meta Business Suite?
Meta Business Suite is useful for anyone managing a Facebook Page or Instagram account. It helps small business owners, marketers, content creators, and agencies organize their publishing, communication, and insights in one place. For larger businesses and organizations, Meta Business Manager is a better choice.
