

How to Create a Video for YouTube
 Anniston Ward
03 September 2026
Anniston Ward
03 September 2026 
With over ¼ of the globe’s population using YouTube once a month, this platform is one of the world’s largest social media, entertainment, and search engines. Therefore, being active on YouTube can help boost your brand’s visibility, and create a community.
But the platform has changed quite a bit in the last year. According to Metricool’s 2026 YouTube Study, which analyzed nearly 800,000 videos from over 70,000 accounts, 61% of all organic views now come from the Shorts feed, and long-form video views are up 76% year-over-year, even as average view duration has dropped 37%.
Before diving into this platform, understanding how to create content on this platform is essential. Content creation and videography are no joke, and can be frustrating to accomplish if you don’t have the fundamentals in place.
So, we are here to walk you through creating a video for YouTube, which will help you publish quality content from the start.
Getting Started on YouTube
In order to create a video for YouTube, you need to have an active account. You also need to decide if you want to create a personal or business channel. With a business account, you can add multiple team members and create multiple channels underneath the account.
If you don’t have a channel set up yet, you need to make sure that your channel descriptions are clear about what content you will be posting, and what your brand’s mission is. Follow this YouTube tutorial below to guide you through setting up your channel, and becoming more comfortable with this network.
8 Steps to Create a Video for YouTube
When you break it down, creating a YouTube video is more reasonable than it seems. Yes, it takes more time than posting a few images to Instagram or filming a 15-second TikTok, however, YouTube videos tend to have a longer “lifespan”, especially if the content is evergreen. In fact, our 2026 data shows that after an initial three-day spike in views and interactions, YouTube content settles into a long, steady tail that can keep generating views for months or even years. It’s refreshingly different from other platforms where content loses relevance within days.
With that, here are 7 steps to creating a YouTube video that will reach your ideal audience, and help elevate your social media presence.
1. Establish your YouTube content strategy
First things first, you need to have a clear goal in mind. This means creating a thorough YouTube strategy, that aligns with your brand’s objectives.
What goals do you want to achieve with this channel? Your goals may be brand awareness, lead generation, increasing sales, driving traffic to your website, building a community, etc.
➡️ Workflow
Next, you need to hash out who will be doing what. Who will write an outline/script? Who will record the video? Who will edit? Upload? All of these need to be taken into consideration before diving into recording.
You can use task management sites such as Asana, or Notion, to create smooth workflows and ensure everyone is aware of their responsibilities.
After establishing your goals and workflow, it’s time to build the strategy. We recommend coming up with a few content pillars, which will be the foundation of what content you post.
➡️ Content strategy and plan
It’s essential to create a thorough content strategy. We have created a social media template that you can, completely for free, to help you through this process.
While getting started, you also should be aware of content pillars. These are themes or categories that you will focus on in your videos. This can be themes such as educational, entertaining, engaging, community, etc.
When going to plan content, you can follow your content pillars to make sure you’re aligning with your goals. We recommend selecting 3-5 content pillars.
To learn more about creating a content strategy, make sure to watch this Masterclass, where we break down 3 easy ways to build a solid strategy.
It’s essential to write out this content strategy plan, whether that’s in a Google Doc, a Google Slides, PowerPoint, etc. This strategy plan will most definitely change, so it’s important to see where you’ve started, and how you can improve your work.
Here you can define how often you will post, what content pillars you will use for each video, your branding styles, and your tone of voice.
It’s essential to create a content calendar, so you can keep track of your videos and brainstorm more ideas. Also, it’s essential to stay consistent with your content to build a trusting community.
Then, decide your long-form vs. Shorts mix. This is more important in 2026 than it used to be. The data shows these formats now play very different roles:
- Long-form video is where you gradually build trust, and its ideal posting cadence is 2 to 4 videos per week. Posting more than that doesn’t improve performance significantly, and posting even a little less than once a week doesn’t hurt individual video performance much either.
- Shorts have no real ceiling. The more you post, the more views you tend to accumulate. Shorts drive 61% of all views on the platform, making them the primary discovery engine.
- Shorts and long-form aren’t competitors on your own channel. Channels that skip Shorts entirely average 4,364 views per long-form video. Channels posting around 5 Shorts a month average 8,789 views per long-form video – 46% above the global average. (That said, the benefit caps out. Channels posting 35+ Shorts a month see long-form performance drop back down to baseline, so there is such a thing as overdoing it.)
2. Research ideas & and choose a topic
Now that you have a clear strategy plan, it’s time to do some research. What should you research? Well first, you need to understand what content keeps your audience engaged.
➡️ Understanding your audience
You can gain this insight from your other social networks, seeing what other creators and businesses in your space are posting, as well as what solutions your ideal audience is looking for.
Then, take this knowledge to keyword sites, such as Keyword.io, Answer the Public, and Semrush. You can even search keywords related to your industry specifically for YouTube, and of course for Google. This will help you understand what your audience is searching for.
➡️ Script and SEO
Once you have landed on a topic, it’s time to brainstorm. We recommend writing a script, so you have a clear idea of what to say when you go to record. You also want to make sure that your content is SEO-friendly, including primary and secondary keywords in your scripts.
If you want to learn more about how to optimize your YouTube videos from the start, check out this guide below.
A note on hashtags: Hashtags are not a major ranking factor on YouTube the way titles, thumbnails, or descriptions are. Our 2026 data shows long-form videos with hashtags actually see about 17% fewer views but 13% more interactions; the audience that arrives via hashtag tends to be more relevant, even if smaller. For Shorts, hashtagged posts see roughly 10% fewer views but nearly 9% higher engagement. The takeaway: hashtags won’t make a video go viral, but they help match your content to the right, more engaged audience. Stick to 1–2 relevant hashtags on long-form videos and 1–5 on Shorts.
3. Record, edit, review
The time has come, to the recording studio! This can be daunting to know what equipment you need, and the best ways to record. However, in order to create a video for YouTube, you don’t need anything crazy to post quality videos.
➡️ Filming equipment
Don’t get too bogged down with the equipment, you essentially just need a phone, a professional(ish) background, and a stable tripod, ring light, or a stable place to set up your camera.
When I say professional(ish) background, I mean that it doesn’t have to be necessarily a blank background, but something that won’t be distracting. It’s also important to film in a quiet environment, so you have clear and crisp audio.
➡️ Recording and editing
Okay, do have your equipment ready? If so, click record and get to it! You don’t need to memorize the whole script, and you can always take breaks to read through the clips, drink water, etc. That’s the beauty of editing videos!
If you will be editing the video yourself, we recommend using an easy-to-use yet powerful editing tool, such as CapCut. You can either download CapCut on your phone, or computer. With this tool, you can split clips, add auto-generated captions, insert transitions, upload new clips, and then export in your preferred format.
➡️ Video quality
An easy way to elevate your videos is to make sure your phone or camera is in maximum quality, 2160p(4K) for quality, and dimensions 3840p x 2160p. Videos at 1440p(2K), and 2560p x 1440p are also considered very high quality. However, 480p resolution is the standard minimum quality for YouTube videos, so keep that in mind.
You can easily export videos on CapCut from your phone, or you can export them on the desktop version.
4. Create a custom thumbnail
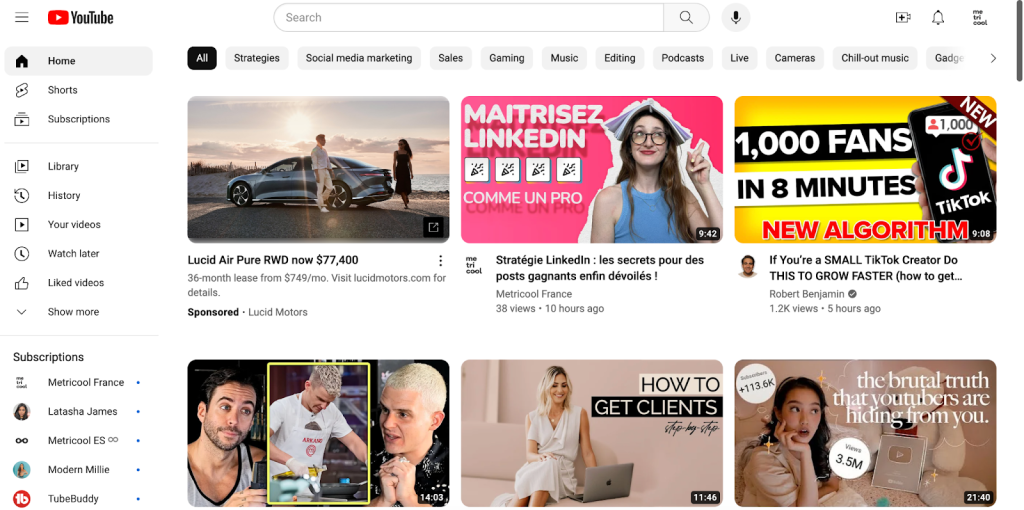
This next step may seem for the advanced YouTubers, but an essential step in making sure your videos stand out on YouTube. You may have seen other YouTuber’s thumbnails, that usually include a photo of themselves with some sort of graphic in the background.
As you can see in the image below, YouTubers love custom thumbnails, because they catch viewer’s attention easily.
Making a thumbnail is actually very simple. First what you need to do is take a picture of yourself against a blank background. You can be pointing to the side, making a surprised facial expression, or a reaction that fits the video topic.
➡️ Designing thumbnail
From here, you can take the image to a simple design tool, such as Canva, Adobe Express, etc. Both Canva and Adobe Express have background removal options. Canvas is only for Premium users, but Adobe Express has a completely free background-removing tool, that you can find here.
Then, you can get to work on the graphic, adding colors and fonts that match your brand image. Then save your new graphic in either JPEG or PNG. YouTube thumbnails should be 1280 x 720 px.
5. Upload your video
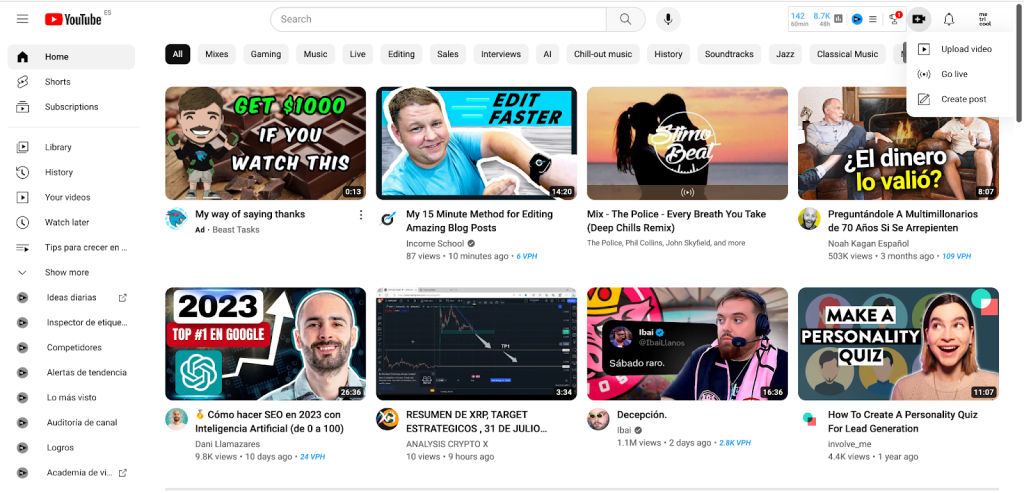
Once your video is all edited, it’s time to upload. To do this, head to the YouTube desktop version and log into your account. On the home screen, you will see a camera icon with a “+” in the middle, click on this and then on “Upload a video.” Then, you will upload the video from your computer by either dragging it into the box or selecting a file.
➡️ File formats
The file format we recommend to upload to YouTube is MP4, with an aspect ratio of 16:9, H.264 video codec, and AAC-LC audio codec. This format is the most widely used, and the most compatible for YouTube.
Other common file formats include MOV, Apple’s video format. To read a full list of accepted file formats on YouTube, read here.
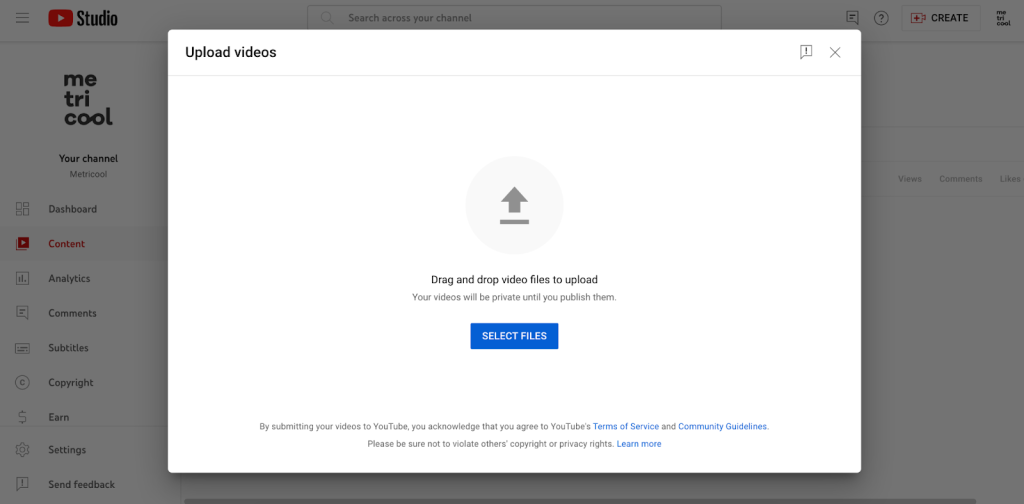
Your video will begin to process, and in the meantime, you can add your title, description, and thumbnail. This process can take up to a few hours, so keep that in mind.
6. Add in video details
➡️ Title and description
While your video is processing, you can add your title and description. As we mentioned in the second step, SEO also comes into play here. Choose a title that is catchy, and includes your main keywords.
You also want to have a thorough description. In this section, you have up to 5000 characters to add more resources, links, timestamps, and CTA’s.
You can learn how to create timestamps in this video from the YouTube Creators channel.
➡️ Thumbnail, playlists, audience
Now is the time to upload your custom thumbnail. You can easily upload a thumbnail from your computer. If you have playlists, you can also choose the add the video to a specific playlist. You can learn how to create a YouTube playlist in the post below.
The last step before moving on is to mark if the video is “made for kids” or not.
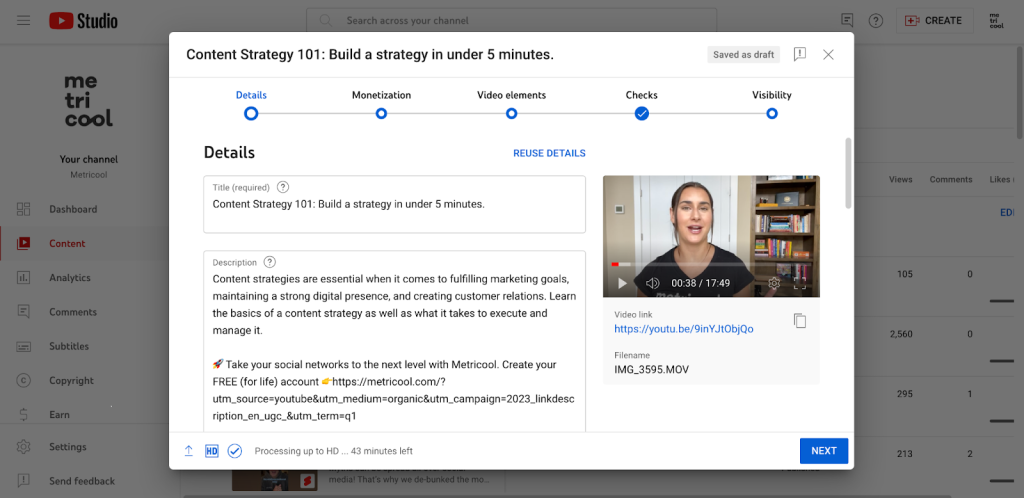
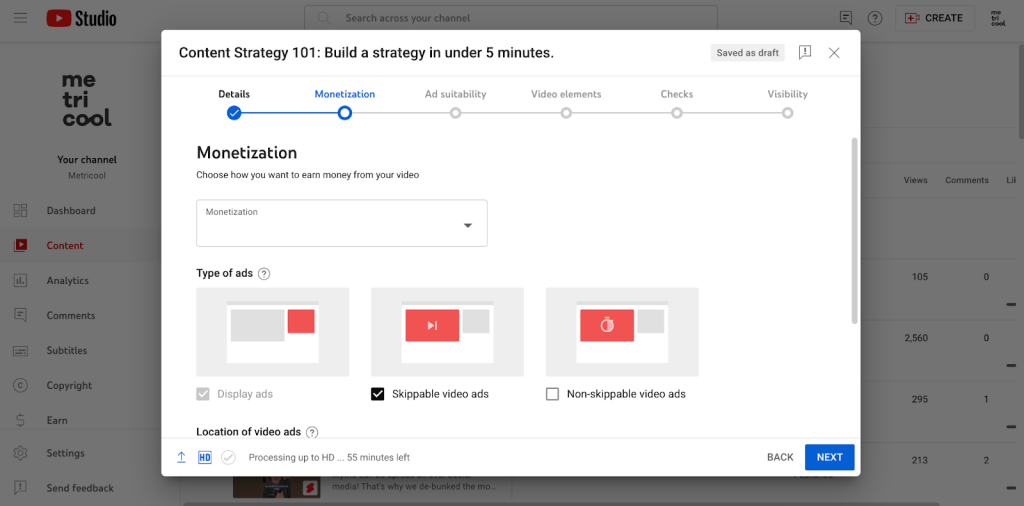
➡️ Monetization
When you’re ready to move on, you will be asked if you want to turn on monetization in your video. If so, you will need to fill out ad suitability details.
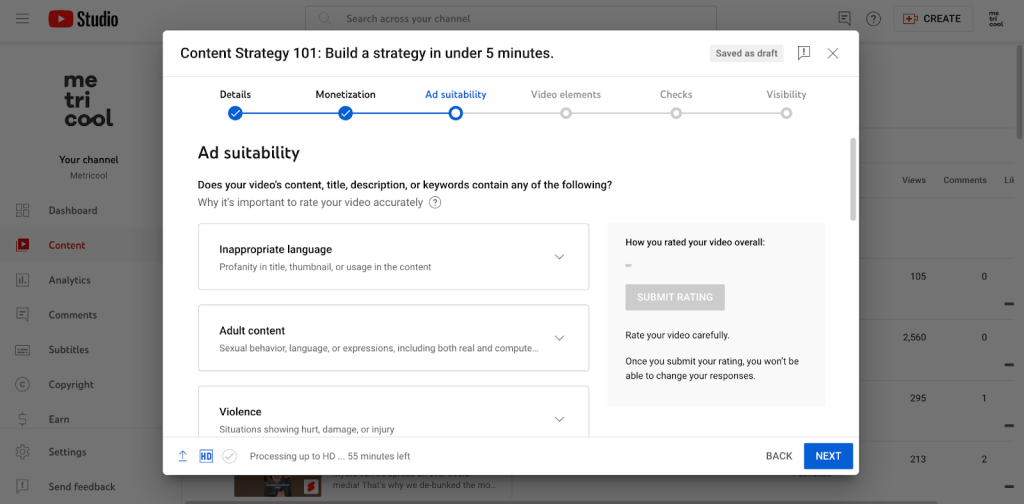
If you don’t intend on monetizing this video just yet, you can press no and skip these two steps.
➡️ Video elements
In this step, you can add extra video elements including music licenses, subtitles, cards, or an end screen. Here you can see a description of each element.
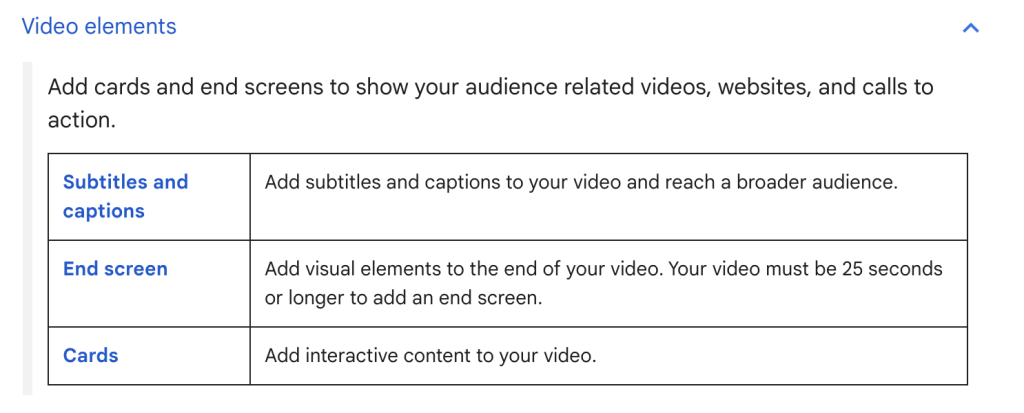
You can import part of the video to add an end screen, which will look like the image below. YouTube also offers some common end-screen templates that can choose from. If you add any cards, a very similar pop-up window will appear and guide you through adding a card.
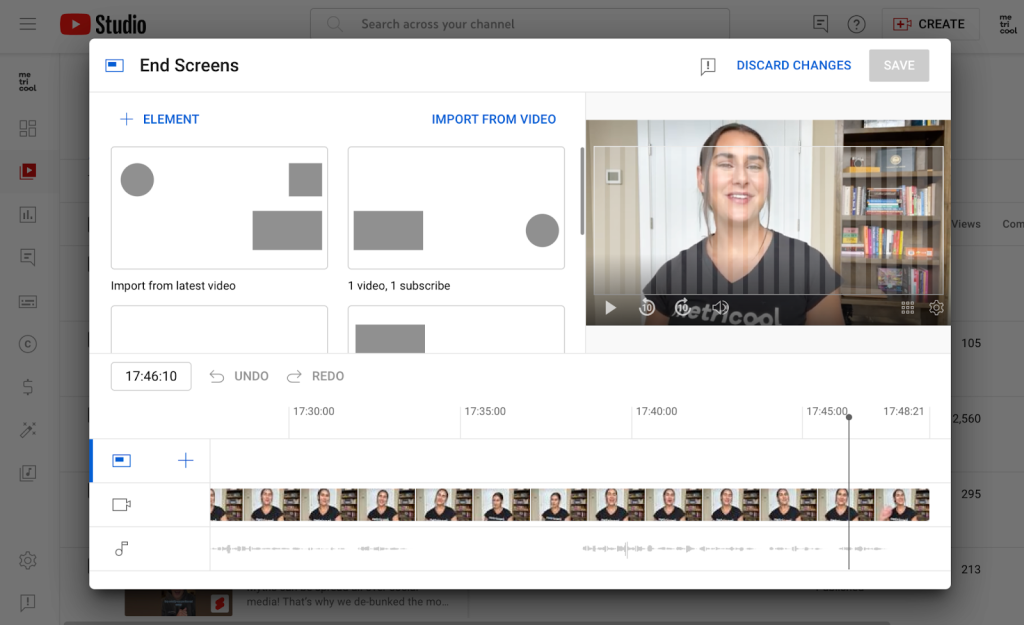
This step is not mandatory and is rather advanced for just starting out. You can always skip this step, or implement these strategies after you feel more comfortable with the platform.
➡️ Checks
YouTube will run a check on your video, to ensure there are no copyright issues. If there are any problems, you will be notified and can change these before posting your video.
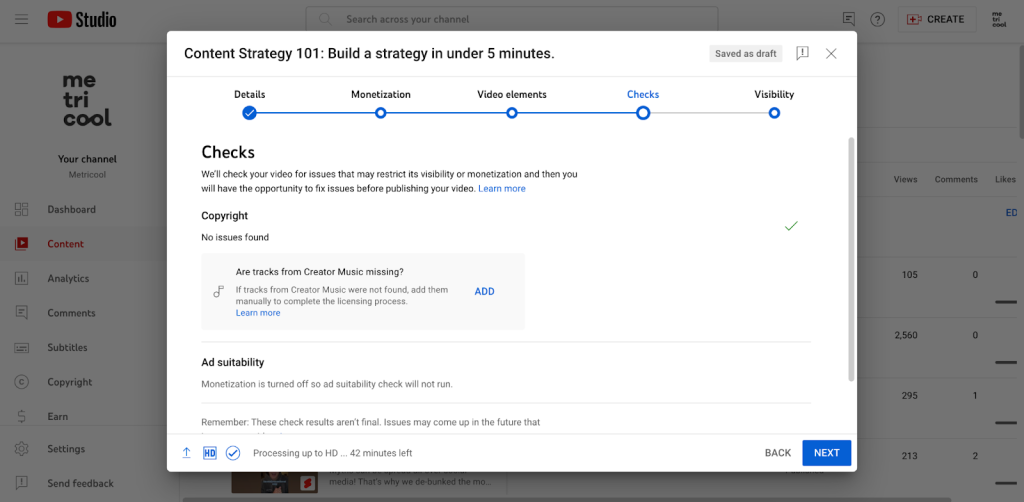
➡️ Visibility
You made it to the last step. Now you can choose when you want your video to go live, and who you will allow to view the video. You can make your video private, unlisted, or public. You can also choose to schedule your video to be posted at a later date.
In the top right corner, you will also see a “Save as draft” option, if you want to come back to your video.
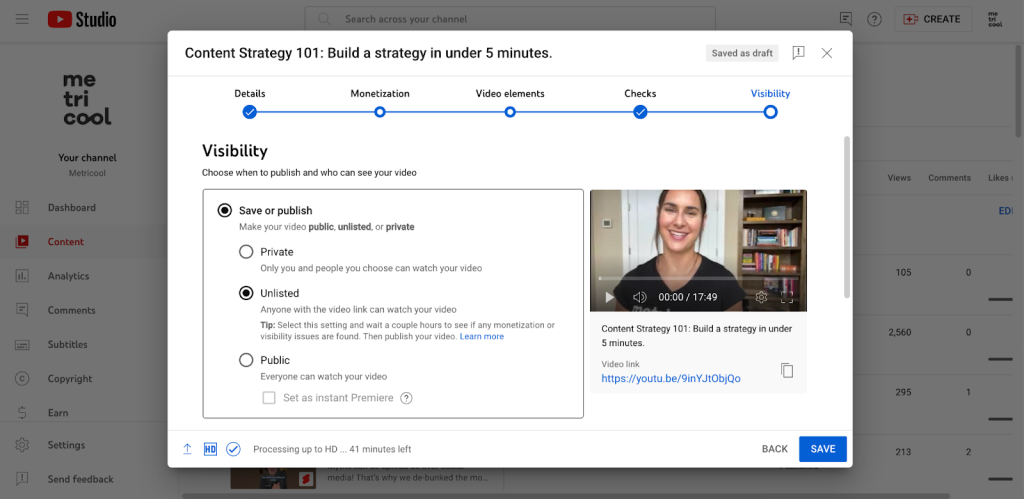
7. Publish, repurpose, engage!
Now it’s time to press post! After reviewing the content, you can publish your YouTube video. Congrats, you did it! We know that this is no walk in park, so well done. After you publish your content, don’t just walk away.
Give repurposing a shot and promote your videos by sharing snippets across other social networks. If you want to turn a short segment of your own long-form video into a Short, TikTok, or Instagram/Facebook Reel, use the Video Clips tool in YouTube Studio. It lets creators repurpose clips from longer videos and archived live streams, making it easier to get more mileage out of content you’ve already created. (Just note that this is different from YouTube’s old consumer Clip button, which is no longer available for this purpose.)
It’s also very important to stay engaged with your audience, meaning responding to comments and messages, and answering any questions.
Did you know that in Metricool you can view and respond to all social media replies, comments, and messages? If you are someone that manages multiple accounts, or doesn’t want to jump between multiple platforms manually, try out our inbox management feature, to have all your messages in one place.
8. Analyze your content
The last step, but one of the most important, is measuring the impact of your content. Thankfully, there are many powerful tools that allow you to see data of views, engagement, interactions, watch time, subscribers. etc.
YouTube has a native management feature called YouTube Studio. Here, you can view in-depth analytics for all your content. This post below will explain what YouTube Studio is, and how it works.
You can also view your channel’s analytics with Metricool. View your channel growth, subscribers balance, demographics, your top-performing posts, and analyze your competitors. This allows you to have a full scope of what content is working well, and what you can do to improve. Plus, see what has worked best for your competitors by adding in their channel handle.
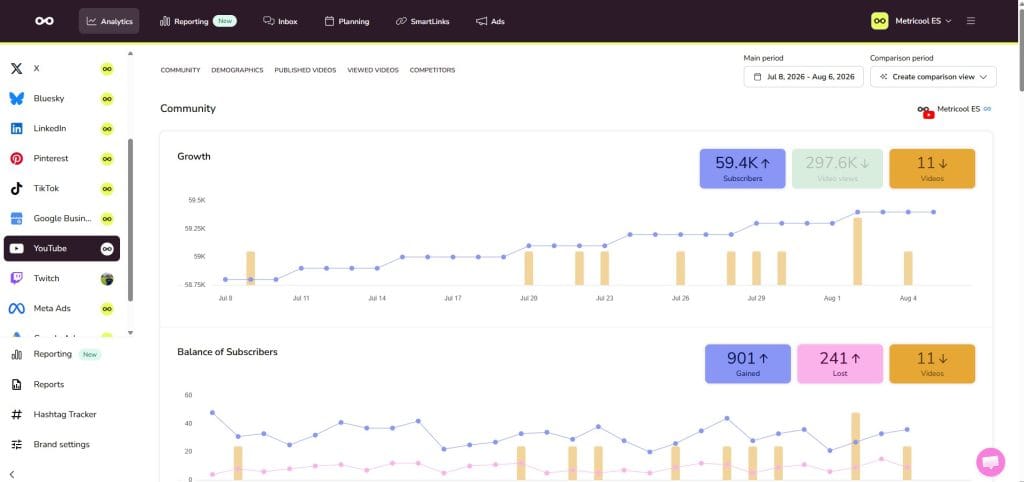
Metricool offers a generous free plan to get you started, so create your free account and manage all your social media accounts in one place.
Well, we know that was a lot of info. But, I hope this post has helped you learn how to create a video for YouTube, so you can start making killer content. Good luck, and don’t hesitate to leave any comments or questions below.
The Big Picture for 2026
Just a few final thoughts to keep in mind as you shape your YouTube strategy in 2026:
- More views, less watch time. Both long-form videos and Shorts are getting more views, but average view duration is trending down across the board. Getting the click is only half the battle, keeping viewers watching is where the real value lies.
- More content isn’t always better. For long-form, publishing 2–4 videos per week appears to be the sweet spot for balancing consistency and performance. With Shorts, you have more room to increase your publishing frequency without seeing the same performance trade-offs.
- YouTube content has staying power. Unlike most social platforms, a well-optimized YouTube video can continue attracting views long after it’s published. That’s why getting your SEO, thumbnails, and content format right from the start can pay off well beyond launch day.
Want to dive deeper into the data and get more insights to shape your YouTube strategy this year?
